Explore our credit programs for startups
You've unlocked a referral bonus! Sign up today and you'll get a random credit bonus between $5 and $500
You've unlocked a referral bonus!
Claim Your Bonus
Claim Bonus
Back
News
September 25th, 2025
minute read

Setting up Slurm on Runpod Instant Clusters: A Technical Guide

Brendan McKeag
Brendan McKeag

Introduction

Slurm (Simple Linux Utility for Resource Management) is a powerful job scheduler and resource manager designed for high-performance computing (HPC) environments. When combined with RunPod's Instant Clusters, it provides a robust platform for managing distributed AI workloads, scientific computing, and batch processing tasks across multiple GPU nodes.

RunPod Instant Clusters can come with Slurm pre-configured, featuring automatic cluster setup with one node designated as the "Slurm Controller" and additional nodes as "Slurm Agents." This guide will walk you through deploying, configuring, and testing a Slurm cluster on Runpod.

Why Choose Slurm Over Standard Clustering?

While you could theoretically manage a cluster using direct TCP/IP connections and manual job distribution, Slurm offers several critical advantages that make it indispensable for serious distributed computing:

Resource Management and Fair Sharing: Slurm intelligently allocates GPUs, CPUs, and memory across jobs, preventing resource conflicts and ensuring optimal utilization. Unlike manual clustering approaches, Slurm can handle complex scenarios where multiple users submit jobs simultaneously, automatically queuing work and allocating resources based on priority, user limits, and availability.

Job Scheduling and Queue Management: Rather than manually coordinating when and where jobs run, Slurm provides sophisticated scheduling algorithms that can optimize for throughput, fairness, or specific priority schemes. It handles dependencies between jobs, manages job arrays for parameter sweeps, and can automatically retry failed jobs - capabilities that would require significant custom development in a basic TCP/IP cluster setup.

Fault Tolerance and Monitoring: Slurm provides built-in monitoring, logging, and fault tolerance that goes far beyond simple network connectivity checks. It tracks job completion, resource usage, and can automatically handle node failures by rescheduling work to healthy nodes. The system maintains detailed accounting records and can generate usage reports - essential features for production environments that are absent in basic clustering approaches.

Integration with Distributed Frameworks: Modern AI frameworks like PyTorch, TensorFlow, and scientific computing tools are designed to work seamlessly with Slurm's environment variables and resource allocation model. This integration handles the complex coordination required for distributed training - managing process ranks, setting up communication backends like NCCL, and coordinating initialization across nodes - tasks that would require extensive custom coordination logic in a manual TCP/IP setup.

Runpod Instant Clusters come with an option to have Slurm pre-configured, featuring automatic cluster setup with one node designated as the "Slurm Controller" and additional nodes as "Slurm Agents."

Setup

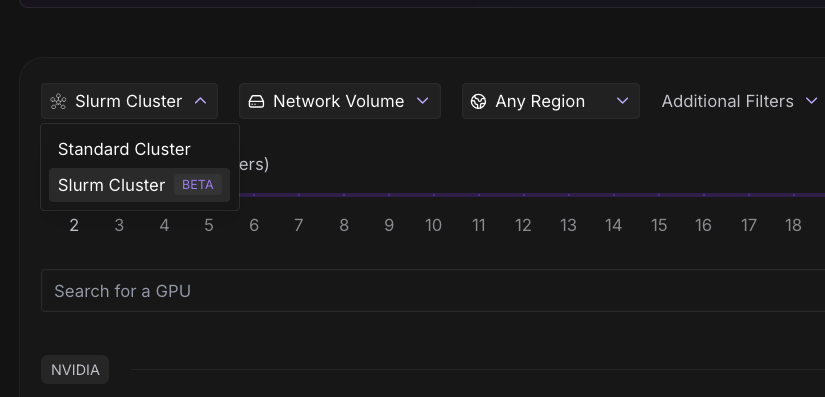
To set up a cluster with Slurm enabled, all you need to do is select Slurm Cluster in the cluster type dropdown when deploying.

Access Your Cluster

Connect to the Controller Node

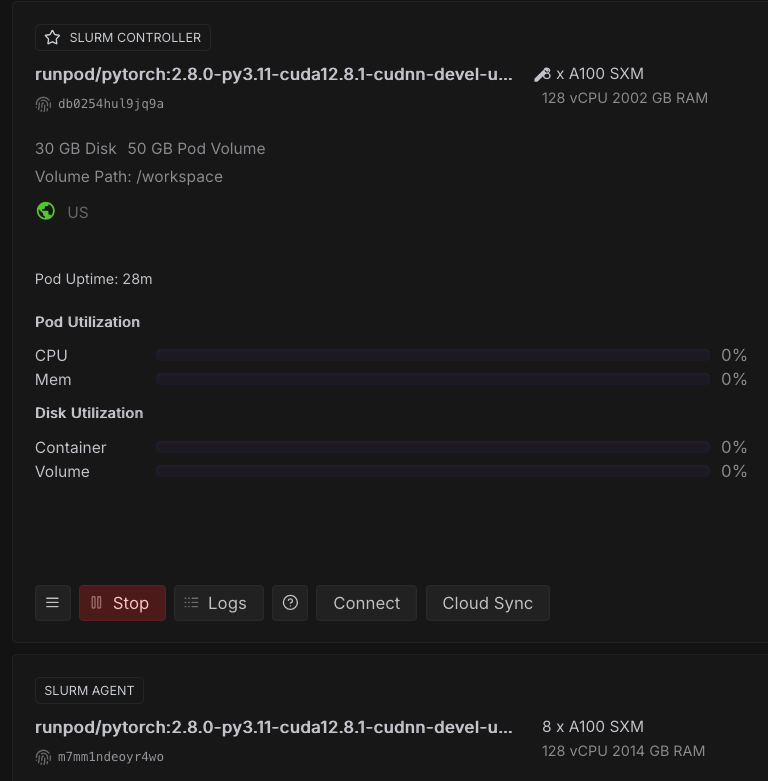
Once deployed, you'll see your cluster nodes listed. The controller node will be labeled "Slurm Controller." You can connect to the Slurm Controller node via Jupyter Notebook and open up a Terminal for ease of access, though any method of connecting via a terminal will work just fine.

Quick Cluster Diagnostic

Run this comprehensive check immediately after connecting:

# Run complete cluster diagnostic
echo "=== SLURM CLUSTER DIAGNOSTIC ==="
echo "1. Cluster Status:"
sinfo

echo -e "\n2. Node Details:"
scontrol show nodes | grep -E "(NodeName|State=|CPUs=|Gres=)"

echo -e "\n3. Partition Configuration:"
scontrol show partition | grep -E "(PartitionName|MaxNodes|State|Default)"

echo -e "\n4. Environment Variables:"
env | grep -E "(PRIMARY|MASTER|NODE|NUM_|WORLD)" | sort

echo -e "\n5. Network Interfaces:"
ip addr show | grep -E "ens[0-9]" | head -10

# Check for the common MaxNodes=1 issue
MAXNODES=$(scontrol show partition debug | grep MaxNodes | awk '{print $2}' | cut -d'=' -f2)
if [[ "$MAXNODES" == "1" ]]; then
    echo -e "\n⚠️  WARNING: Default partition has MaxNodes=1"
    echo "   This will prevent multi-node jobs. Fix with:"
    echo "   sudo scontrol update PartitionName=debug MaxNodes=UNLIMITED"
fi

You should see the following:

=== SLURM CLUSTER DIAGNOSTIC ===
1. Cluster Status:
PARTITION AVAIL  TIMELIMIT  NODES  STATE NODELIST
gpu*         up   infinite      2   idle node-[0-1]

2. Node Details:
NodeName=node-0 Arch=x86_64 CoresPerSocket=1 
   Gres=gpu:8
   State=IDLE ThreadsPerCore=1 TmpDisk=0 Weight=1 Owner=N/A MCS_label=N/A
NodeName=node-1 Arch=x86_64 CoresPerSocket=1 
   Gres=gpu:8
   State=IDLE ThreadsPerCore=1 TmpDisk=0 Weight=1 Owner=N/A MCS_label=N/A

3. Partition Configuration:
PartitionName=gpu
   AllocNodes=ALL Default=YES QoS=N/A
   DefaultTime=NONE DisableRootJobs=NO ExclusiveUser=NO GraceTime=0 Hidden=NO
   MaxNodes=UNLIMITED MaxTime=UNLIMITED MinNodes=0 LLN=NO MaxCPUsPerNode=UNLIMITED
   State=UP TotalCPUs=256 TotalNodes=2 SelectTypeParameters=NONE
   JobDefaults=(null)

4. Environment Variables:
HOST_NODE_ADDR=10.65.0.2:29400
MASTER_ADDR=10.65.0.2
MASTER_PORT=29400
NODE_ADDR=10.65.0.3/24
NODE_RANK=1
NODE_ROLE=SLURM_COMPUTE
NUM_NODES=2
NUM_TRAINERS=8
PRIMARY_ADDR=10.65.0.2
PRIMARY_PORT=29400
WORLD_SIZE=16

5. Network Interfaces:
2352: ens1@if2350: <BROADCAST,MULTICAST,UP,LOWER_UP> mtu 1994 qdisc noqueue state UP group default 
    inet 10.65.0.3/24 brd 10.65.0.255 scope global ens1
root@node-1:/workspace# 

Notably, you’ll want to make sure you have the IP addresses of all your nodes in your cluster, as we’ll need this later. In this case, they are:

10.65.0.2, 10.65.0.3

You can also use sinfo to verify that all nodes are up and running:

root@node-1:/workspace# sinfo
PARTITION AVAIL  TIMELIMIT  NODES  STATE NODELIST
gpu*         up   infinite      2   idle node-[0-1]

Creating, Testing, and Running Multi-Node Scripts

Create a directory for your Slurm jobs:

mkdir -p /workspace/slurm-jobs
cd /workspace/slurm-jobs

The easiest way to run and submit jobs on Slurm is to save them as .sh files, and then to submit them with the sbatch command.

For example, here is a script to test communication between nodes. You can just run this in the terminal and it will write everything directly to the .sh or .py files as needed.

# Create test script (using default partition - no --partition specified)
cat > connectivity_test.sh << 'EOF'
#!/bin/bash
#SBATCH --job-name=connectivity_test
#SBATCH --nodes=2
#SBATCH --ntasks=2
#SBATCH --time=00:05:00
#SBATCH --output=connectivity_%j.out
#SBATCH --error=connectivity_%j.err

echo "Running on node: $(hostname)"
echo "Node rank: $SLURM_NODEID"
echo "Task ID: $SLURM_PROCID"
echo "Available GPUs: $CUDA_VISIBLE_DEVICES"
echo "Job nodelist: $SLURM_JOB_NODELIST"

# Simple connectivity test - each task reports its hostname
srun hostname
EOF

chmod +x connectivity_test.sh

Here is a script to test distributed Pytorch training across nodes:

cat > pytorch_dist_test.py << 'EOF'
#!/usr/bin/env python3
import torch
import torch.distributed as dist
import os
import socket

def init_distributed():
    """Initialize distributed training with proper Slurm integration"""
    
    # Get Slurm environment variables
    if 'SLURM_PROCID' in os.environ:
        rank = int(os.environ['SLURM_PROCID'])
        world_size = int(os.environ['SLURM_NPROCS'])
        local_rank = int(os.environ.get('SLURM_LOCALID', '0'))
        
        # For multi-node, calculate local rank based on tasks per node
        gpus_per_node = torch.cuda.device_count()
        local_rank = rank % gpus_per_node
        
        print(f"Slurm detected - Rank: {rank}, World size: {world_size}, Local rank: {local_rank}, GPUs per node: {gpus_per_node}")
    else:
        rank = 0
        world_size = 1
        local_rank = 0
        print("No Slurm environment detected - running single process")
    
    # Validate local rank
    if local_rank >= torch.cuda.device_count():
        print(f"WARNING: local_rank {local_rank} >= available GPUs {torch.cuda.device_count()}, using GPU 0")
        local_rank = 0
    
    # Set up environment for distributed training
    if 'MASTER_ADDR' not in os.environ:
        os.environ['MASTER_ADDR'] = os.environ.get('PRIMARY_ADDR', 'localhost')
    if 'MASTER_PORT' not in os.environ:
        # Use a different port for each job to avoid conflicts
        base_port = int(os.environ.get('PRIMARY_PORT', '29500'))
        job_id = int(os.environ.get('SLURM_JOB_ID', '0'))
        os.environ['MASTER_PORT'] = str(base_port + (job_id % 100))
    
    print(f"Master: {os.environ['MASTER_ADDR']}:{os.environ['MASTER_PORT']}")
    
    # Configure NCCL
    os.environ['NCCL_SOCKET_IFNAME'] = 'ens1'
    os.environ['NCCL_DEBUG'] = 'INFO'
    
    # Only initialize if we have multiple processes
    if world_size > 1:
        dist.init_process_group(
            backend='nccl',
            init_method='env://',
            world_size=world_size,
            rank=rank
        )
        print(f"Initialized process group - Rank {rank}/{world_size}")
    else:
        print("Single process mode - no process group initialization needed")
    
    torch.cuda.set_device(local_rank)
    return rank, world_size, local_rank

def main():
    print(f"Starting on host: {socket.gethostname()}")
    print(f"CUDA available: {torch.cuda.is_available()}")
    print(f"CUDA device count: {torch.cuda.device_count()}")
    
    if not torch.cuda.is_available():
        print("ERROR: CUDA not available!")
        return
    
    rank, world_size, local_rank = init_distributed()
    
    print(f"Process {rank}/{world_size} using GPU {local_rank}")
    
    # Simple tensor operation test
    device = torch.device(f'cuda:{local_rank}')
    tensor = torch.ones(2, 2, device=device) * rank
    
    print(f"Rank {rank} tensor before all_reduce: {tensor}")
    
    # Test all_reduce operation only if we have multiple processes
    if world_size > 1:
        dist.all_reduce(tensor, op=dist.ReduceOp.SUM)
        print(f"Rank {rank} tensor after all_reduce: {tensor}")
        
        # Test barrier
        dist.barrier()
        
        if rank == 0:
            print("✅ Distributed PyTorch test completed successfully!")
        
        dist.destroy_process_group()
    else:
        print("✅ Single-node PyTorch test completed successfully!")

if __name__ == '__main__':
    main()

EOF

# Create Slurm script for PyTorch test
cat > pytorch_test.sh << 'EOF'
#!/bin/bash
#SBATCH --job-name=pytorch_dist_test
#SBATCH --nodes=2
#SBATCH --ntasks=4
#SBATCH --gres=gpu:2
#SBATCH --time=00:15:00
#SBATCH --output=pytorch_test_%j.out

# Set up distributed training environment
export MASTER_ADDR=$PRIMARY_ADDR
export MASTER_PORT=$PRIMARY_PORT
export WORLD_SIZE=$SLURM_NPROCS
export RANK=$SLURM_PROCID

# Configure NCCL for proper networking
export NCCL_SOCKET_IFNAME=ens1
export NCCL_DEBUG=INFO

# Run the test
srun python3 pytorch_dist_test.py
EOF

# Submit PyTorch test
sbatch pytorch_test.sh

You can run these, or any other scripts you create using the following commands:

# Submit the job
sbatch connectivity_test.sh

# Check job status
squeue

# Check job details (replace JOBID with actual job ID)
scontrol show job JOBID

The results of any given job run will be written to .out files (or .err files if there is an error). Here’s what you should see in the output when testing the distributed training test:

=== Simple Distributed PyTorch Test ===
Job ID: 29
Nodes: node-[0-1]
Process ID: 0
Running on: node-0
Master: 10.65.0.2:29400
CUDA_VISIBLE_DEVICES: 0,3
Process 1 starting on NVIDIA A100-SXM4-80GB
Initializing process group: rank=1, world_size=2
✅ Process 1 initialized successfully
Rank 1 tensor before all_reduce: tensor([[1., 1.],
        [1., 1.]], device='cuda:0')
Rank 1 tensor after all_reduce: tensor([[1., 1.],
        [1., 1.]], device='cuda:0')
Process 0 starting on NVIDIA A100-SXM4-80GB
Initializing process group: rank=0, world_size=2
✅ Process 0 initialized successfully
Rank 0 tensor before all_reduce: tensor([[0., 0.],
        [0., 0.]], device='cuda:0')
Rank 0 tensor after all_reduce: tensor([[1., 1.],
        [1., 1.]], device='cuda:0')
✅ All processes completed successfully!

Process Summary

This guide walked you through a systematic approach to deploying and validating Slurm on RunPod Instant Clusters. We started with basic cluster deployment and connectivity verification, then progressively tested more complex distributed computing scenarios. The connectivity test confirmed that nodes could communicate and execute jobs across the cluster, while the GPU detection test verified that CUDA resources were properly allocated and visible to Slurm jobs.

The single-node PyTorch test established that the AI framework stack was functioning correctly on individual nodes, providing a foundation for distributed testing. The multi-node PyTorch distributed test represented the culmination of our validation process, demonstrating that NCCL could successfully coordinate tensor operations between nodes using the high-speed ens1 network interface. The successful all_reduce operation - where tensors from different ranks were properly aggregated across nodes - confirmed that the cluster is ready for real distributed training workloads.

Newly  Features

We've cooked up a bunch of improvements designed to reduce friction and make the.

Create ->
Newly  Features

We've cooked up a bunch of improvements designed to reduce friction and make the.

Create ->
Newly  Features

We've cooked up a bunch of improvements designed to reduce friction and make the.

Create ->
Newly  Features

We've cooked up a bunch of improvements designed to reduce friction and make the.

Create ->

Build what’s next.

The most cost-effective platform for building, training, and scaling machine learning models—ready when you are.

You’ve unlocked a
referral bonus!

Sign up today and you’ll get a random credit bonus between $5 and $500 when you spend your first $10 on Runpod.