.jpeg)
Deploy When Available is now GA
Queue for any GPU spec, even one that's fully rented out, and we'll deploy it the moment capacity opens up. No more refreshing the console or running a sniping tool.
All
Blog
New to serverless? This guide shows you how to deploy a basic "Hello World" API on Runpod Serverless using Docker, perfect for beginners testing their.


If you're new to serverless computing and Docker, this guide will walk you through creating your first Runpod serverless endpoint from scratch. We'll build a simple "Hello World" application that demonstrates the basic concepts of serverless deployment on Runpod's platform. You'll learn how to build a Docker image locally, push it to Dockerhub, set up an endpoint on Runpod, and send your first request to it.
Before diving into the technical steps, let's understand what we're building and why. Imagine you're a chef who wants to serve food to customers. In a traditional setup (like a regular server), you'd need to rent a restaurant space full-time, pay for utilities, and maintain the kitchen even when no customers are present. This is like running a traditional server that's always on – essentially our Pod service. And while this is the right solution for some use cases, we believe in offering you multiple options to make the best use of our service.
Serverless computing is more like having a kitchen that magically appears only when customers order food and disappears when they're done eating. You only pay for the actual time spent cooking. Docker containers are like standardized, portable kitchen setups that ensure your recipes work the same way whether you're cooking in New York or Tokyo. We've discussed in the past about how a serverless scaling strategy can help you make the most of your GPU spend.
In this tutorial, we're going to create a simple "kitchen" (Docker container) that knows how to say hello to people, package it up so it can be shared (push to DockerHub), and then set it up on Runpod's serverless platform where it will spring to life whenever someone wants a greeting.
Before we begin, make sure you have the following installed on your MacOS system:
Note that while this tutorial is tuned for MacOS users, the terminal commands should work just fine on most flavors of Linux, or you can look into installing Windows Subsystem for Linux on a Windows install.
You'll also want to be sure Docker Desktop is running to prevent any potential Docker daemon errors.
First, let's create a new directory for our project and set up the necessary files. Run this in the Terminal:
Create a new file called handler.py with this simple "Hello World" handler:
Create a new file called Dockerfile that will define how to build your container:
Create a requirements.txt file with our dependencies:
Let's build the Docker image and test it locally. Be sure to replace the username with your Dockerhub username, e.g. brendanmckeag/runpod-hello-world:latest.
Note that you must build for linux/amd64 (otherwise you'll run into an 'exec format error' error down the line.)
If running the docker run command to test, you'll get an error:
This is normal. When we run a Runpod serverless worker locally, it looks for a file called test_input.json by default. This file simulates the input that would normally come from actual API requests in production. Since we haven't created this file yet, the worker exits immediately. This error/warning is not worrisome, but seeing it instead of some other response is a good sign that you're on the right track.
Now that we've built and tested our image, let's push it to DockerHub:
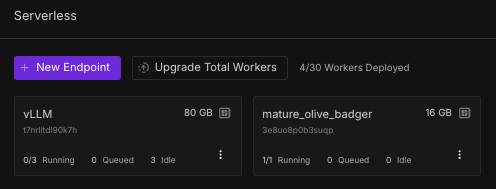
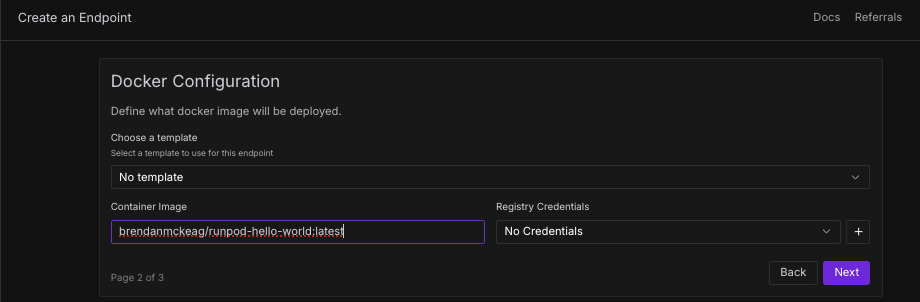
Go to Runpod's Serverless dashboard and click "New Endpoint" and then Docker Image.
Under Container Image, put in your Docker image path, just substitute your Docker Hub username. I've left the image used in this demonstration up under brendanmckeag if you'd like to test it, otherwise substitute your username instead.
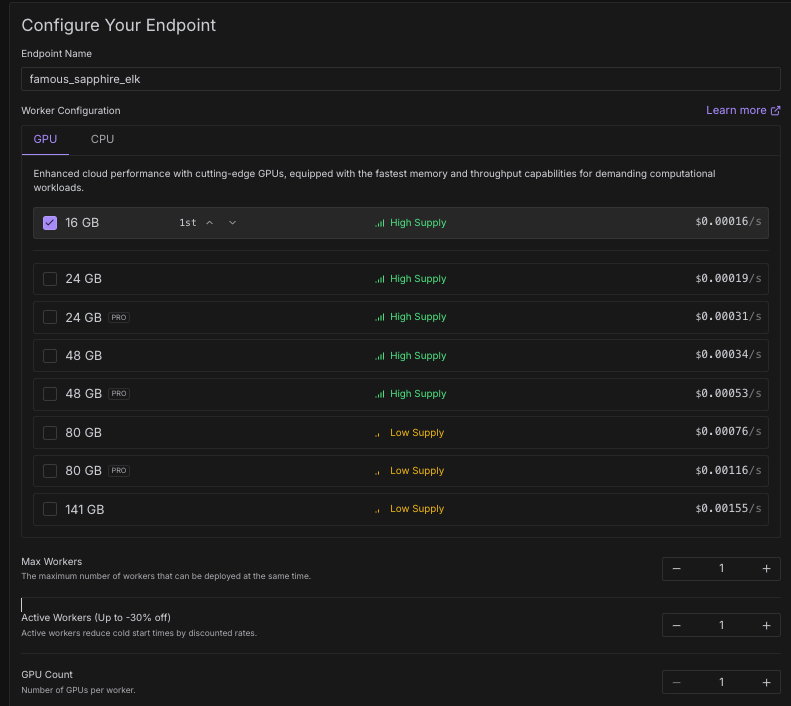
Fill in the following details - since this is a simple example, you don't need a high powered GPU spec example. You could even test this with CPU if you wanted to, but for the purposes of this example we'll select a 16GB spec. Once you're all set, click Create Endpoint at the bottom.
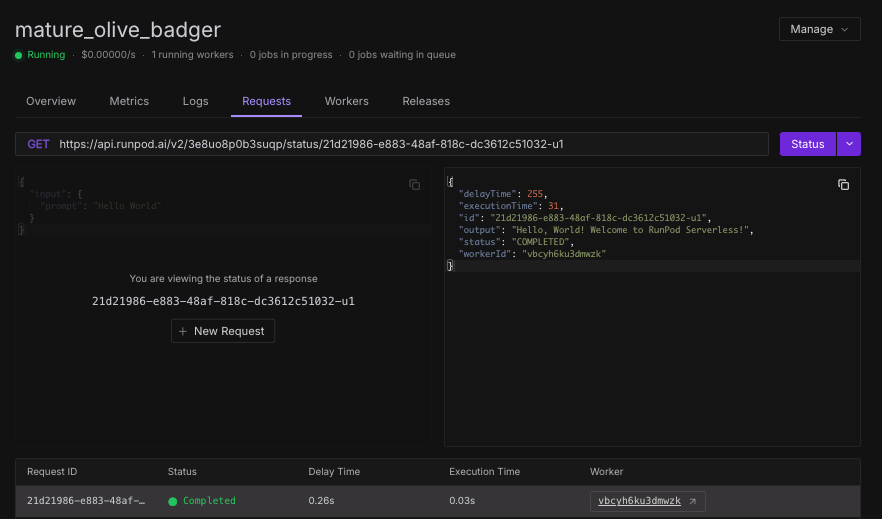
You can test the endpoint by going to your Serverless console and then clicking on the endpoint, and then clicking on Requests. Click on the Streaming checkbox, and then Run.
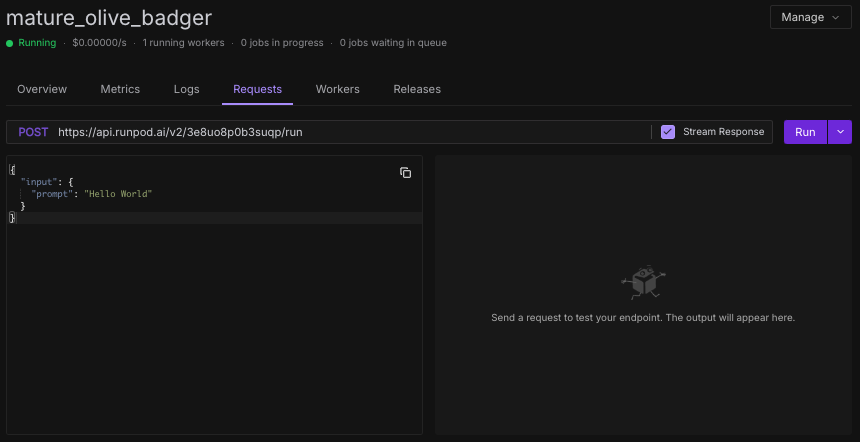
Note that under the dropdown you will have two options for Run and Runsync, the differences are as follows:
And once you send the request, you should see a response come back!
Understanding the flow of data helps debug issues. Your handler function expects input in a specific format because Runpod needs a standardized way to communicate with all serverless functions. Docker containers need to be built locally first because they package up your code and all its dependencies into a portable unit. DockerHub acts as a central distribution point, like a public library where Runpod can fetch your container. And lastly, Runpod creates isolated environments for each request, ensuring security and resource isolation.
Now that you have a working serverless endpoint, you can:
Remember that your handler can be as simple or complex as you need - from basic text processing to running sophisticated AI models. The deployment process remains the same regardless of the complexity of your application.
We've got further instructions in our docs if you'd like to read further. You're not at all limited to sending requests through the console on the Runpod platform; you can send requests through cURL with an API key from any application you choose.
You've now successfully created and deployed your first Runpod serverless endpoint! This foundation will help you understand how to deploy more complex applications on Runpod's infrastructure. Whether you're building AI applications, data processing pipelines, or web services, the basic workflow remains the same.
Author profile: Brendan McKeag
Blog Posts
Queue for any GPU spec, even one that's fully rented out, and we'll deploy it the moment capacity opens up. No more refreshing the console or running a sniping tool.
Explore why faster chips have shifted the bottleneck to AI infrastructure, and what that means for teams running production workloads.
.jpeg)
With MIG, we can partition RTX 6000 Pro cards into isolated 24 GB instances. Here's when it makes sense for your workloads.
