How to clone your voice and build a text-to-speech model with F5-TTS on Runpod
Record 30 minutes of your own speech, fine-tune the open-source F5-TTS model on a Runpod GPU pod, and generate new audio in your voice. Covers dataset prep, training, checkpoint selection, and the F5-TTS license.
Text-to-speech (TTS) models turn written text into spoken audio. Most TTS voices are generic. Voice cloning makes a model speak in one particular person's voice. Commercial services can clone your voice with AI, but they keep your recordings and the model on their servers, and you pay for every sentence they generate. With an open-source model and a rented GPU, you own the whole pipeline: your recordings, the trained model, and every file it produces.
In this tutorial, you'll train a TTS model that speaks English in your own voice. You'll record yourself reading English text, upload the recordings to a GPU pod on Runpod, and fine-tune F5-TTS on them. F5-TTS is an open-source voice cloning model that can copy a voice from a short sample and can also be fine-tuned on longer recordings. You'll start from its official base model, which already speaks English, and teach it the details of your voice.
At the end, you'll have a voice model that reads any text in your voice, and the commands to generate new audio with it later.
How it works
There are two ways to make an open-source model sound like you:
Zero-shot voice cloning gives the model a single 10-second sample of your voice at generation time. No training is involved. F5-TTS supports this out of the box. It's fast, but it only copies the overall sound of your voice.
Fine-tuning continues training the model on 30 minutes or more of your own speech. It also learns your rhythm, accent, and pronunciation, so the result is closer to how you actually speak. This tutorial uses fine-tuning.
F5-TTS has no built-in pronunciation dictionary. It learns how written text sounds directly from recordings, so fine-tuning also teaches it how you pronounce words: your accent, and the names and technical terms you use often.
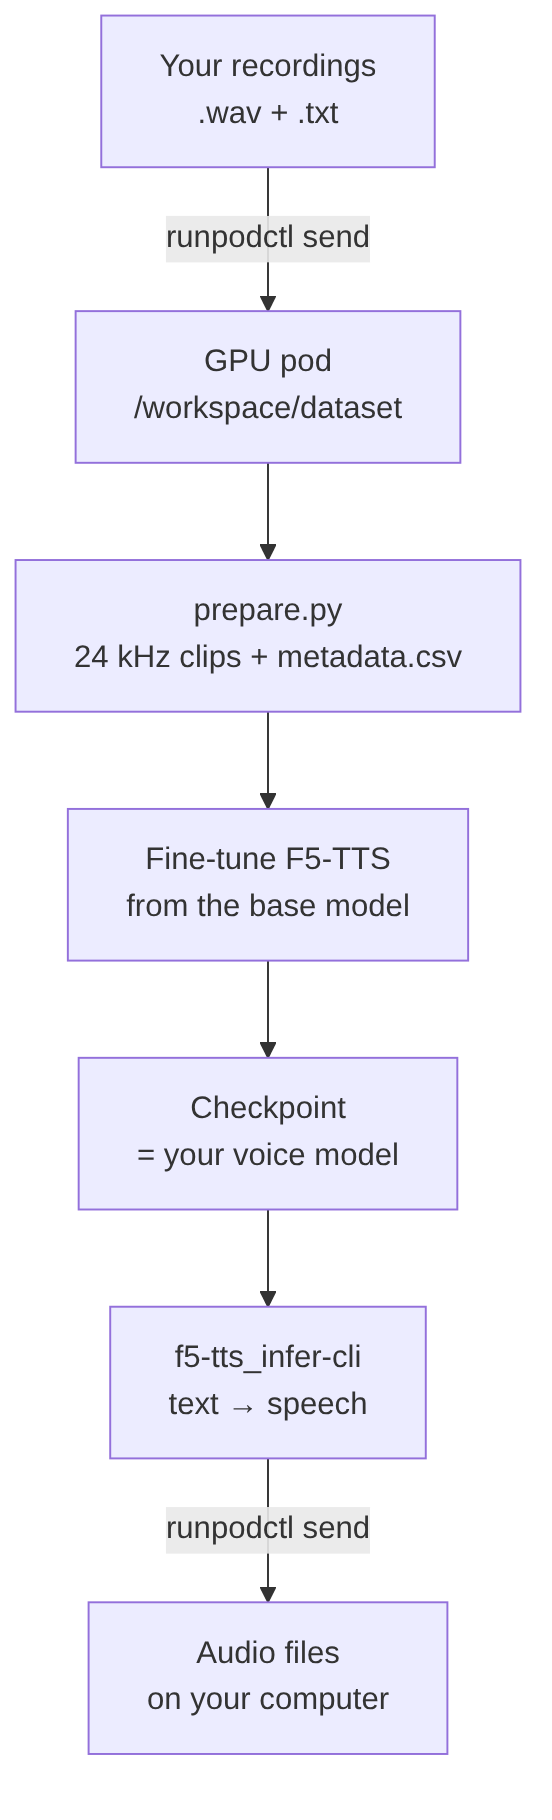
The following diagram shows the whole pipeline:
The voice cloning pipeline, from your recordings to generated audio.
F5-TTS license and commercial use: this setup is for personal use only. The F5-TTS code is MIT-licensed, but its pretrained weights are non-commercial (CC-BY-NC) because of their training data, and a model fine-tuned from them inherits that restriction. You can't sell audio or services built on it. If you need commercial use, look at Chatterbox, which is MIT-licensed.
Prerequisites
To complete this tutorial, you will need:
A Runpod account with credit for a few hours of GPU time. Sign up at the Runpod console. The console shows the hourly price of each GPU before you deploy.
runpodctl, the Runpod command-line tool, installed on your computer. You'll use it to move files to and from the pod. Install it with Homebrew on macOS (brew install runpod/runpodctl/runpodctl) or with the install script on Linux and macOS (bash <(curl -sL cli.runpod.io)). For Windows and other options, follow the runpodctl installation guide. File transfers don't need an API key, so you can skip the API key setup in that guide.
A microphone and a quiet room to record in. A USB microphone or a good headset microphone works well.
Familiarity with a Linux terminal: running commands, changing directories, and reading error messages. If you're new to the terminal, read An Introduction to the Linux Terminal.
Step 1: Recording and transcribing your voice
The quality of your recordings sets the ceiling for the quality of your voice model. A model trained on noisy, inconsistent audio reproduces the noise and inconsistency. In this step, you'll record your voice and write a transcript for each recording.
Each recording needs a matching text file with the same name, for example voice001.wav and voice001.txt. The .txt file contains exactly the words you said in the .wav file. The model learns by comparing the two, so any difference between them teaches it something wrong.
Use the following guidelines when you record:
What
Recommendation
Total audio
30 minutes minimum. 1-2 hours gives the best results.
Recording length
3-15 seconds per recording is ideal. Longer recordings are fine: Step 5 splits them into short clips automatically.
Format
WAV, 24 kHz or higher, mono. Step 5 converts everything to 24 kHz mono.
Room
Quiet, with soft furnishings and no echo. A closet full of clothes works well.
Microphone
The same microphone, at the same distance and volume, for every recording.
Delivery
Read naturally, in the style you want the model to have. Vary your sentences: questions, exclamations, long and short.
Transcripts
Exactly what you said, with normal spelling and punctuation. Write numbers and symbols the way you said them ("twenty twenty-six", not "2026"; "fifty percent", not "50%"). Re-record or delete any recording where you stumbled.
Including words you use often
The base model guesses how to pronounce unusual words from their spelling. If you'll generate text with names, product names, or technical terms, teach it how you say them:
Make a list of the uncommon words you'll want the model to say, such as your name, your company's products, or the jargon of your field.
Use each one in at least 3-5 recordings, inside natural sentences.
Spell them the same way in your transcripts and in the text you'll generate later. The model connects spelling to sound, so a word spelled two ways is two different words to it.
Naming and organizing your files
You can name your files anything, as long as each pair follows these rules:
The .wav and .txt files have the same name. Names are case-sensitive: Intro.wav doesn't match intro.txt.
The extensions are lowercase: .wav and .txt, not .WAV or .TXT.
The names don't contain the | character.
Put all the pairs directly inside a single folder named dataset, with no subfolders. For example:
Next, you'll create the GPU pod that will train your model.
Step 2: Deploying a GPU pod on Runpod
A pod is a container running on a rented GPU machine. You get a terminal on it and pay per second while it runs, while the console shows the rate by the hour. In this step, you'll deploy a pod with enough GPU memory to fine-tune F5-TTS, and attach a network volume so your work survives a restart or termination.
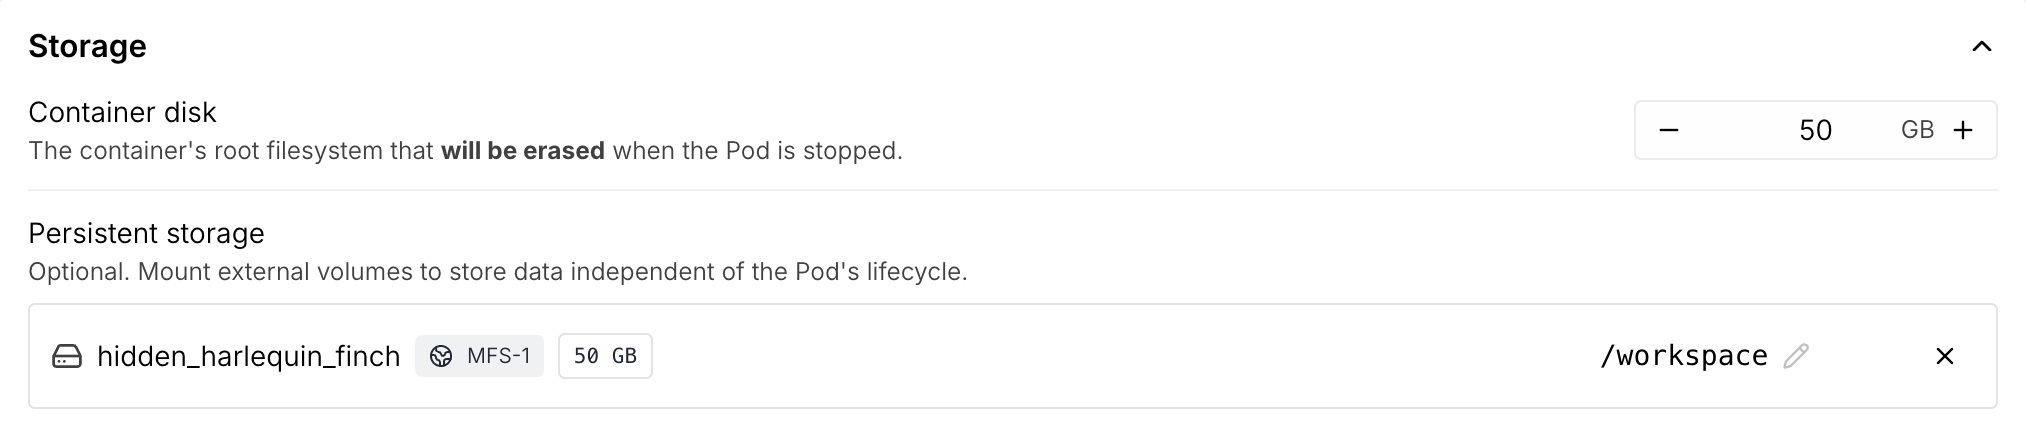
A pod has two kinds of storage, and only one of them keeps your files when the pod stops:
The container disk holds the operating system and installed software. It's erased every time the pod stops.
The network volume is mounted at /workspace. It exists independently of the pod, so it survives stops, restarts, and termination. Fine-tuning takes more than an hour, and the network volume keeps your recordings and checkpoints if the pod is terminated partway through. Everything you create in this tutorial goes in /workspace.
Select Secure Cloud. Your recordings and the voice model you train from them are biometric data. Secure Cloud runs them on dedicated hardware in enterprise data centers, while Community Cloud runs on hardware owned by third-party hosts.
Choose a GPU with at least 24 GB of memory (VRAM). An L4 or A5000 is enough. An L40S or A6000 (48 GB) lets you train with bigger batches. The console shows the current hourly price of each.
Under the template, choose Runpod Pytorch 2.8.0 (image runpod/pytorch:1.0.2-cu1281-torch280-ubuntu2404). It includes PyTorch 2.8 and CUDA 12.8, which F5-TTS recommends, with SSH and Jupyter enabled.
Add a network volume for persistent storage. If you skip this, the console warns "Nothing mounted at the template's path", and /workspace ends up on the container disk, where it's erased when the pod stops. Click Add volume, mount it at /workspace, and set the size to 50 GB. Each training checkpoint is about 5.4 GB, and training writes about 34 GB in total, so the smaller size the template suggests runs out.
Click Deploy.
Under Persistent storage, attach a network volume and mount it at /workspace.
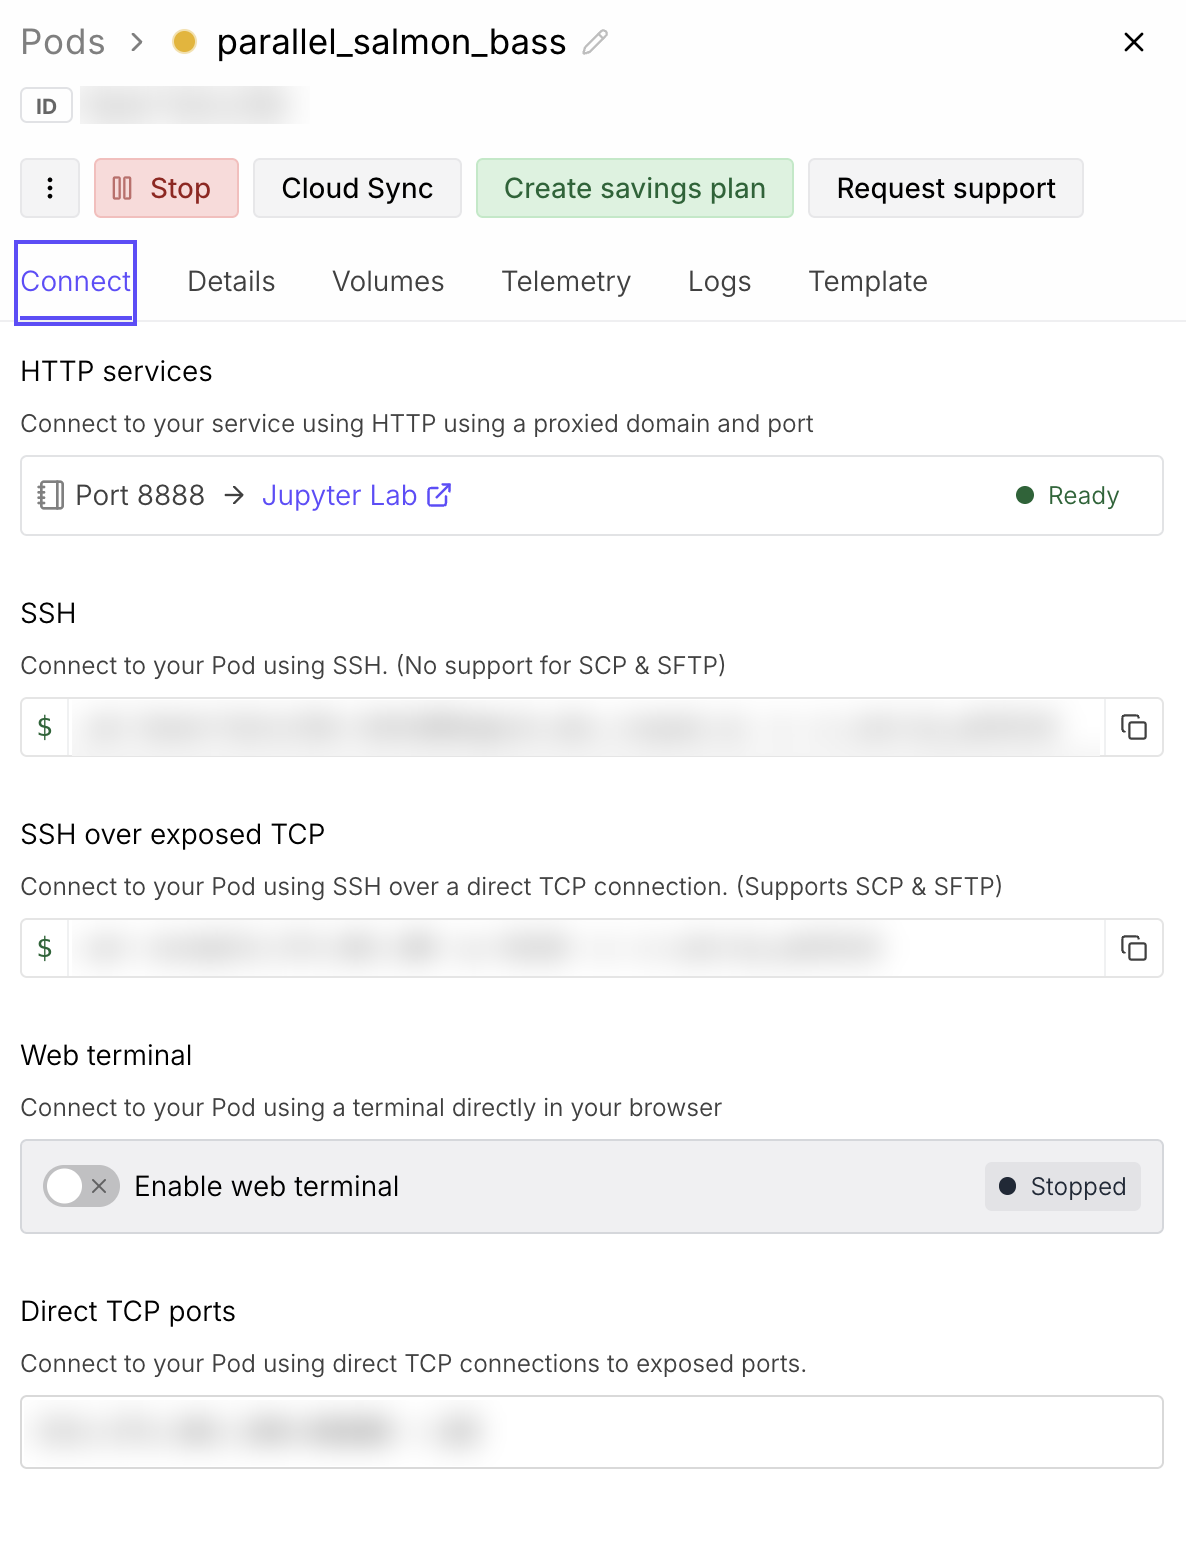
When the pod's status shows it's running, click Connect, then open the Web Terminal. If you've added an SSH key to your Runpod account, you can use the SSH command shown there instead.
The Connect tab. Turn on Enable web terminal to open a terminal in your browser.
Run the pod commands in Steps 3 to 8 in this pod terminal. Each step says when a command runs on your computer instead.
Note: you can also deploy the pod through an AI agent. With Claude Code and the Runpod MCP server, ask it to "create a Runpod Pytorch 2.8.0 pod on Secure Cloud with an L4 and a 50 GB volume mounted at /workspace". It can check GPU availability and quote the price before it creates anything. Name the volume explicitly, or the pod may start without persistent storage.
Next, you'll copy your recordings onto the pod.
Step 3: Uploading your recordings with runpodctl
runpodctl send and runpodctl receive move files between any two computers. send prints a one-time code and waits. Running receive with that code on the other computer starts the transfer. The connection is encrypted with a key derived from the code, and it needs no login: the code is the only thing that connects the two ends, so don't share it.
On your computer, go to the folder that contains your dataset folder, and send the folder by name:
runpodctl send dataset
runpodctl zips the folder and prints a code, followed by the command to run on the other side. The output looks like this, with a different code:
code is: 5254-respect-amen-emotion-14on the other computer runrunpodctl receive 5254-respect-amen-emotion-14
Leave this terminal open. The transfer stops if send exits before the other side finishes.
Warning: don't run runpodctl send . from inside the dataset folder. runpodctl names the zip after the folder, so . becomes ..zip, and receive rejects it with Invalid file path ..zip.
In the pod terminal, go to /workspace and receive the folder. Replace the code with the one your computer printed:
cd /workspacerunpodctl receive 5254-respect-amen-emotion-14
Files land in the directory where you run receive, so the cd /workspace is what puts them on persistent storage. When the transfer finishes, list the first few files to confirm they arrived:
ls /workspace/dataset | head
You should see your .wav and .txt files. If you send another batch later, give the new files different names: receive overwrites files with the same name without asking.
Next, you'll install F5-TTS.
Step 4: Installing F5-TTS
In this step, you'll install F5-TTS and its dependencies.
First, install FFmpeg, which F5-TTS and the preparation script use to read and convert audio. Then clone F5-TTS into /workspace and install it in editable mode (pip install -e .), which lets Python use the code directly from the cloned folder. The git checkout line pins F5-TTS to the commit this tutorial was tested with (f5-tts 1.1.22, PyTorch 2.8.0, torchcodec 0.7.0, transformers 5.22.2, accelerate 1.15.0, Python 3.12.3), so a later change to the main branch can't break the steps:
pip install -e . installs the newest version of torchcodec, an audio decoding library. That version is built for newer PyTorch releases and CUDA 13, and fails on this pod with OSError: libnvrtc.so.13: cannot open shared object file. Replace it with version 0.7, the release built for PyTorch 2.8:
Next, write a default configuration for Accelerate, the library F5-TTS uses to run training on the GPU:
accelerate config default
You don't need to download the base model yourself. The first time you start training, F5-TTS downloads its official F5TTS_v1_Base model from Hugging Face automatically.
Note: installed Python packages live on the container disk, which is erased when the pod stops. Your files in /workspace are kept, including the F5-TTS folder. After you stop and restart the pod, or deploy a new pod with the same network volume, reinstall the packages with the following commands, without cloning again:
Next, you'll turn your recordings into a dataset the trainer can read.
Step 5: Preparing the training dataset
F5-TTS trains on clips of 1 to 30 seconds, at 24 kHz mono, listed in a metadata.csv file of the form audio_file|text. In this step, you'll run a script that converts your recordings into that format, then pack the result into the files the trainer reads.
The script handles each recording according to its length:
Recordings of 30 seconds or less are converted and used as they are. The 80% check below doesn't run on them, so check their transcripts carefully before you upload.
Longer recordings are split into clips of about 3-15 seconds:
Whisper, a speech recognition model, works out when each word is spoken.
Those words are matched against your own transcript, so the text of each clip is exactly what you wrote, not Whisper's version of it.
The recording is cut at pauses after punctuation, preferring the ends of sentences.
A clip is dropped if less than 80% of its words could be matched to the audio, for example where you skipped or reworded a sentence. It's also dropped if no cut point keeps it under 25 seconds.
The script also reads transcripts saved in the older Windows-1252 encoding, which some Windows and Mac editors use. Reading those as UTF-8 fails on characters like curly quotes (’) or dashes (—).
Create the script and run it. The cat > … <<'EOF' line writes everything up to the closing EOF into /workspace/prepare.py:
cat > /workspace/prepare.py <<'EOF'import difflib, pathlib, subprocess, unicodedataimport soundfile as sfsrc = pathlib.Path("/workspace/dataset")out = pathlib.Path("/workspace/dataset_24k")out.mkdir(exist_ok=True)MIN_CLIP, TARGET_MAX, HARD_MAX = 3.0, 15.0, 25.0 # secondsMIN_MATCH = 0.8 # share of a clip's words Whisper must have heard as writtenSTRONG, WEAK = ".?!…", ",;:"def read_transcript(path): raw = path.read_bytes() try: return raw.decode("utf-8-sig") except UnicodeDecodeError: # Some Windows/Mac editors save text as Windows-1252 instead of UTF-8. print(f"NOTE {path.name}: not UTF-8, reading it as Windows-1252") return raw.decode("cp1252")def to_24k(src_path, dst_path, start=None, end=None): cmd = ["ffmpeg", "-loglevel", "error", "-y"] if start is not None: cmd += ["-ss", f"{start:.3f}", "-to", f"{end:.3f}"] cmd += ["-i", str(src_path), "-ac", "1", "-ar", "24000", str(dst_path)] subprocess.run(cmd, check=True)def norm(word): word = unicodedata.normalize("NFKD", word.lower()) return "".join(c for c in word if c.isalnum())_asr = Nonedef word_timestamps(path): """[(word, start, end)] for every word Whisper hears in the file.""" global _asr if _asr is None: import torch from transformers import pipeline _asr = pipeline("automatic-speech-recognition", model="openai/whisper-large-v3-turbo", device="cuda:0" if torch.cuda.is_available() else "cpu") result = _asr(str(path), chunk_length_s=30, batch_size=1, return_timestamps="word", generate_kwargs={"language": "en", "task": "transcribe"}) words = [] for chunk in result["chunks"]: start, end = chunk["timestamp"] if start is None: continue words.append((chunk["text"].strip(), start, end if end is not None else start + 0.3)) return wordsdef plan_clips(tokens, words, duration): """Split a long recording into clips. Returns [(text, start, end, matched_share)].""" sm = difflib.SequenceMatcher(None, [norm(t) for t in tokens], [norm(w[0]) for w in words], autojunk=False) t2w = {} for a, b, size in sm.get_matching_blocks(): for k in range(size): t2w[a + k] = b + k if not t2w: return [] # Possible cut points: after a punctuated word, between two words Whisper placed in time. cands = [] for i in range(len(tokens) - 1): if i in t2w and i + 1 in t2w and tokens[i][-1] in STRONG + WEAK: cut = (words[t2w[i]][2] + words[t2w[i + 1]][1]) / 2 cands.append((i, cut, tokens[i][-1] in STRONG)) spans = [] # (first_token, last_token, start, end) first = min(t2w) s_i, s_t = 0, max(0.0, words[t2w[first]][1] - 0.15) last_strong = last_any = None for c in cands: i, cut, strong = c length = cut - s_t if length > TARGET_MAX: pick = last_strong or last_any if pick: spans.append((s_i, pick[0], s_t, pick[1])) s_i, s_t = pick[0] + 1, pick[1] last_strong = last_any = None length = cut - s_t if length > TARGET_MAX: # no cut point in range: take this one, may be dropped later spans.append((s_i, i, s_t, cut)) s_i, s_t = i + 1, cut continue if length >= MIN_CLIP: last_any = c if strong: last_strong = c last = max(t2w) spans.append((s_i, len(tokens) - 1, s_t, min(duration, words[t2w[last]][2] + 0.15))) clips = [] for a, b, start, end in spans: matched = sum(1 for k in range(a, b + 1) if k in t2w) / (b - a + 1) clips.append((" ".join(tokens[a:b + 1]), start, end, matched)) return clipsrows, total, dropped = [], 0.0, 0for wav in sorted(src.glob("*.wav")): txt = wav.with_suffix(".txt") if not txt.exists(): print(f"SKIP {wav.name}: no {txt.name}") continue text = " ".join(read_transcript(txt).split()).replace("|", " ") duration = sf.info(str(wav)).duration if duration <= 30: if duration < 1: print(f"SKIP {wav.name}: {duration:.1f}s (shorter than 1s)") continue dst = out / wav.name to_24k(wav, dst) rows.append((str(dst), text)) total += duration continue print(f"SPLIT {wav.name}: {duration:.1f}s") clips = plan_clips(text.split(), word_timestamps(wav), duration) if not clips: print(f"SKIP {wav.name}: the audio doesn't match its transcript at all") continue for n, (clip_text, start, end, matched) in enumerate(clips, 1): length = end - start if not 1 <= length <= HARD_MAX or matched < MIN_MATCH: dropped += length print(f" drop {n:03d}: {length:.1f}s, {matched:.0%} of words matched: {clip_text[:60]}") continue dst = out / f"{wav.stem}_{n:03d}.wav" to_24k(wav, dst, start, end) rows.append((str(dst), clip_text)) total += lengthwith open("/workspace/metadata.csv", "w", encoding="utf-8") as f: f.write("audio_file|text\n") f.writelines(f"{a}|{t}\n" for a, t in rows)print(f"{len(rows)} clips, {total/60:.1f} minutes kept, {dropped/60:.1f} minutes dropped")EOFpython /workspace/prepare.py
The first time a recording needs splitting, the script downloads Whisper (about 1.6 GB), which takes a minute. While it runs, it prints one line for each file that needs attention:
NOTE means a transcript wasn't UTF-8 and was read as Windows-1252.
SPLIT means a recording was longer than 30 seconds and is being split into clips.
drop means a clip was left out, with the share of its words that matched the audio.
SKIP means a recording was left out entirely, for example because it has no matching .txt file.
You can ignore two warnings about the Hugging Face Hub (the site Whisper downloads from) and chunk_length_s. They don't affect the result.
The last line summarizes the dataset. It looks like this, with your own numbers:
If fewer than 30 minutes were kept, record more before you continue, because the minimum in Step 1 applies to what survives preparation. If a lot of audio was dropped, compare the affected recordings with their transcripts: the text must match what you actually said. Before you continue, check the result in two ways:
Look at the first lines of metadata.csv with head -5 /workspace/metadata.csv, and make sure the text looks right, including quotes and dashes.
Download and listen to a few clips from /workspace/dataset_24k/ to check where they were cut. You can download single files from Jupyter (Connect → Jupyter Lab, then right-click a file and choose Download).
Now pack the dataset into the format the trainer reads. The prepare_csv_wavs.py script that comes with F5-TTS reads metadata.csv and writes three files. One of them is vocab.txt, the list of characters the model knows, copied from the base model so that the two match:
cd /workspace/F5-TTSpython src/f5_tts/train/datasets/prepare_csv_wavs.py /workspace/metadata.csv /workspace/F5-TTS/data/myvoice_pinyinls /workspace/F5-TTS/data/myvoice_pinyin
The ls should list these three files:
duration.json raw.arrow vocab.txt
The trainer finds the dataset by its folder name, which must be the dataset name (myvoice) plus the tokenizer (pinyin). The pinyin tokenizer only changes Chinese characters, so it leaves English text as it is.
Next, you'll fine-tune the model on this dataset.
Step 6: Fine-tuning F5-TTS on your voice
Fine-tuning continues training the base model on your recordings, so it shifts toward your voice. Training happens in updates: each update shows the model a batch of clips and adjusts it a little. One pass through your whole dataset is an epoch. Every so often, the trainer saves a checkpoint, a file with the model's state at that point. Each checkpoint is a complete voice model you can generate audio with.
nohup … & runs training in the background and keeps it running if your terminal disconnects. Everything it prints goes to /workspace/train.log.
--exp_name F5TTS_v1_Base selects the base model to start from, and --finetune tells the trainer to continue from its weights instead of starting from scratch. The first run downloads those weights from Hugging Face.
--dataset_name myvoice points to the data/myvoice_pinyin folder from Step 5.
--learning_rate 1e-5 sets how much each update changes the model. A low rate keeps the model from forgetting what it already knows about speech.
--batch_size_per_gpu 3200 with --batch_size_type frame puts about 34 seconds of audio in each update. It fits in 24 GB of GPU memory. On a 48 GB GPU, you can raise it to 6400.
--epochs 200 and --num_warmup_updates 300 set how long to train, and how many updates the learning rate takes to ramp up at the start.
--save_per_updates 500 saves a numbered checkpoint every 500 updates, and --keep_last_n_checkpoints 5 deletes older ones to save space. --last_per_updates 200 refreshes model_last.pt every 200 updates.
--log_samples makes a test recording at every numbered checkpoint, so you can hear how training is going.
Follow the log to watch training start:
tail -f /workspace/train.log
The log first prints copy checkpoint for finetune, then a progress bar with the current update. Press CTRL+C to stop following the log. This only stops tail; training keeps running.
Checkpoints are saved in /workspace/F5-TTS/ckpts/myvoice/ as model_<update>.pt, plus model_last.pt. The test recordings are saved in /workspace/F5-TTS/ckpts/myvoice/samples/ as update_<update>_gen.wav (generated by the model) and update_<update>_ref.wav (the original clip for comparison). Download and listen to them as training goes:
Early samples sound like the base model, or a rough mix of it and your voice.
As training continues, they should sound more and more like you.
If later samples start to sound metallic or robotic, the model is overtraining, memorizing your clips instead of learning your voice. Use an earlier checkpoint.
How long training takes depends on how much audio you have. With 30 minutes of audio, 200 epochs is about 12,000 updates, which took about 75 minutes on an L4. You don't have to wait for all 200 epochs: once the samples sound like you and stop improving, stop training:
pkill -f finetune_cli
If training stops early, for example because the pod restarted, run the same training command again. The trainer finds model_last.pt and continues from there.
The trainer keeps only the five newest numbered checkpoints, which covers the last 2,500 updates, so a checkpoint from before overtraining started may already be deleted by the time you hear the problem. When a sample sounds right, copy its checkpoint somewhere the trainer won't delete it, for example with mkdir -p /workspace/keep and then cp ckpts/myvoice/model_2500.pt /workspace/keep/ (replace 2500 with the update you heard), or pull it off the pod with runpodctl send. Each checkpoint is about 5.4 GB, and the trainer's own files reach about 34 GB, so a 50 GB volume has room for only two copies in /workspace/keep. Delete copies you no longer need, or create an 80 GB volume in Step 2 if you plan to keep more.
Next, you'll use your fine-tuned model to generate speech.
Step 7: Generating speech in your voice
To generate speech, F5-TTS needs three things: a checkpoint, the text to speak, and a reference clip. The reference clip is a short recording of your voice, with its exact transcript. The model uses it as an example of the tone, pace, and recording conditions to imitate. A calm reference produces calm speech, and an excited one produces excited speech.
First, choose a reference clip. List some clips and their transcripts from your dataset:
head -20 /workspace/metadata.csv
Pick a clip that's clean, 5-12 seconds long, and in the tone you want. Store its path in a variable, replacing voice681_003.wav with the clip you chose, and look up its transcript from metadata.csv:
The echo prints the clip's transcript. If it prints an empty line, the path in REF doesn't match a line in metadata.csv.
Next, write the text you want spoken into a file:
cat > /workspace/script.txt <<'EOF'Hi, I'm not actually saying this. It's a model trained on my voice, running on Runpod. Tomorrow I have a meeting to review the feedback on the new release.EOF
Now generate the audio with f5-tts_infer-cli. The --model, --ckpt_file, and --vocab_file options load your fine-tuned model. --ref_audio and --ref_text give it the reference clip, and --gen_file gives it the text to speak:
The audio is saved as /workspace/output/my_voice.wav. Long texts are split into chunks, generated one at a time, and joined.
To get the best result, try these adjustments:
Compare checkpoints. Generate the same text with every checkpoint you kept and the same reference clip. Use a few sentences that don't appear in any of your transcripts, because the training samples only show how the model handles sentences it trained on. Listen for skipped, repeated, or mispronounced words, cut-off endings, and how much each one sounds like you. The last checkpoint isn't always the best one.
Try other reference clips. The reference has a big effect on the tone of the result.
Fix mispronounced words. Write them the same way you wrote them in your transcripts. If one still sounds wrong, record more clips that use it and train again, or spell it phonetically in the text (for example "Kubernetes" as "koo-ber-net-eez").
Trim pauses. Add --remove_silence to remove long silences between chunks.
Change the pace. Add --speed 0.9 to slow the speech down or --speed 1.1 to speed it up.
Next, you'll download your audio and model and clean up the pod.
Step 8: Downloading your audio and cleaning up
Your audio and your voice model are on the pod. In this step, you'll download them to your computer and stop paying for the GPU.
In the pod terminal, send the output folder:
runpodctl send /workspace/output
On your computer, go to the folder where you want the audio, and receive it with the code the pod printed:
runpodctl receive 5254-respect-amen-emotion-14
The audio arrives in an output folder in the current directory.
To keep the voice model itself, download your best checkpoint and its vocabulary file in the same way. Those two files are the complete model:
Replace model_last.pt with the checkpoint you chose in Step 7, including one you copied to /workspace/keep. To load the model again later, use the same f5-tts_infer-cli options as in Step 7, including --model F5TTS_v1_Base.
When you're done, stop paying for the pod. In the Runpod console, open the pod's menu and choose one of these:
Stop if you'll come back to it. GPU billing stops, but the network volume at /workspace keeps billing at the network volume storage rate, which is the same whether the pod is running or stopped. See the pricing page.
Terminate when you're finished. GPU billing stops, and the network volume and everything on it survive, so you can attach it to a new pod later. The volume keeps billing until you delete it. When you no longer need it, download your model and delete the volume from the Storage page in the console.
Only clone voices you have the right to use, which here means your own. Keep the checkpoint private: anyone who has it can make audio that sounds like you.
Troubleshooting
This section lists the problems you're most likely to hit, in the order of the steps, with the cause and the fix for each.
The console warns "Nothing mounted at the template's path" (Step 2)
The pod has no persistent storage, so /workspace would be erased when it stops. Click Add volume, and mount a 50 GB network volume at /workspace before you deploy. A network volume can only be attached when the pod is created.
receive fails with Invalid file path ..zip (Step 3)
You ran runpodctl send . from inside the folder. On the pod, delete the leftover zip with rm -f /workspace/..zip /workspace/dataset/..zip. Then, on your computer, go one folder up and run runpodctl send dataset.
OSError: libnvrtc.so.13: cannot open shared object file (Steps 5-7)
The newest torchcodec doesn't work with PyTorch 2.8. Run pip install "torchcodec==0.7.*", as shown in Step 4.
ModuleNotFoundError or command not found: f5-tts_infer-cli after a restart (any step)
The pod was stopped, and the container disk with the installed packages was erased. Reinstall them with the commands in the note at the end of Step 4.
prepare.py prints 0 clips or skips files (Step 5)
SKIP … no ….txt: the .wav has no .txt with exactly the same name. Check the case of the names and extensions.
Many drop lines: the transcripts don't match what you said. Compare the recording with its .txt.
No output at all for a file: its extension isn't lowercase .wav.
Transcripts show characters like ’ instead of ’ (Step 5)
The transcript was saved in an encoding the script didn't expect. Open it in a text editor, save it as UTF-8, upload it again, and rerun prepare.py.
torch.OutOfMemoryError: CUDA out of memory (Steps 5-6)
Another process is using the GPU, or the batch is too large for its memory.
Run nvidia-smi to see how much GPU memory is in use. If nothing should be running, find leftover Python processes with ps aux | grep python and stop them with kill, followed by the process ID. Don't run prepare.py while training is running.
If training runs out of memory on its own, lower --batch_size_per_gpu to 2400 or 1600.
Training exits right away with subprocess.CalledProcessError (Step 6)
That message only says the training script failed. Find the real error in the log:
The packing commands in Step 5 didn't run, or failed. Run them again, and check that ls /workspace/F5-TTS/data/myvoice_pinyin lists duration.json, raw.arrow, and vocab.txt.
The voice doesn't sound like you, or sounds metallic (Steps 6-7)
Not like you: train longer, add more recordings (aim for 30 minutes or more after preparation), or try a different reference clip.
Metallic or robotic: the model has overtrained. Use an earlier model_<update>.pt checkpoint, including any you copied to /workspace/keep.
Some words are mispronounced, skipped, or repeated (Step 7)
The model hasn't heard you say those words often enough. Record more clips that use them, prepare the dataset again, and continue training. As a quick fix, spell the word phonetically in the text you generate. If words are skipped or repeated, or the ending is cut off, compare checkpoints and reference clips as described in Step 7, and make sure REF_TEXT matches the reference audio exactly. If the problem appears where chunks join in a long text, try shorter sentences in your script.
Conclusion
Your voice model is two files, a checkpoint and vocab.txt, that you own and can run again whenever you need new audio.
To improve or extend it from here:
Add more audio. Quality keeps improving up to 1-2 hours of recordings. Add new recordings to dataset, rerun Step 5, and continue training from your last checkpoint.
Serve it as an API. Package the model in a container and deploy it as a Runpod Serverless endpoint, so other applications can request speech without a pod running all the time.
Support more languages or commercial use. For a voice in several languages, or for audio you can sell, a multilingual, MIT-licensed model like Chatterbox Multilingual clones a voice from a short sample in over 20 languages, without training.
Get started
Manage GPU workloads on Runpod with coding agents like Claude Code, Codex and Cursor.