.jpeg)
Deploy When Available is now GA
Queue for any GPU spec, even one that's fully rented out, and we'll deploy it the moment capacity opens up. No more refreshing the console or running a sniping tool.
All
Blog
This guide explains how to launch a Runpod instance using the "Runpod Fast Stable Diffusion" template and train Dreambooth models using the included.


Following up on the previous post, in this article we will walk through setting up a Runpod instance with the "Runpod Fast Stable Diffusion" template and using it to run Dreambooth with the bundled Jupyter Notebook.
The first few steps are a repeat of the previous post, so if you are familiar with it, you might want to jump directly to the Dreambooth specific instructions. If you are using the same pod as before, make sure to close the previous notebook. To do so you can go up to "Kernel" in the toolbar, and click "Shut Down All Kernels", then go to "File" in the toolbar and click "Close and Shutdown Notebook".
1. To spin up a pod in Runpod's Secure Cloud with the "Runpod Fast Stable Diffusion" template, you can use this link. It will bring you to an interface where you can choose the GPU and parameters you would like your pod to be provisioned with.
Either the "1x RTX 3090" or "1x RTX A5000" are good options for this task. Click the select button under one of the options.
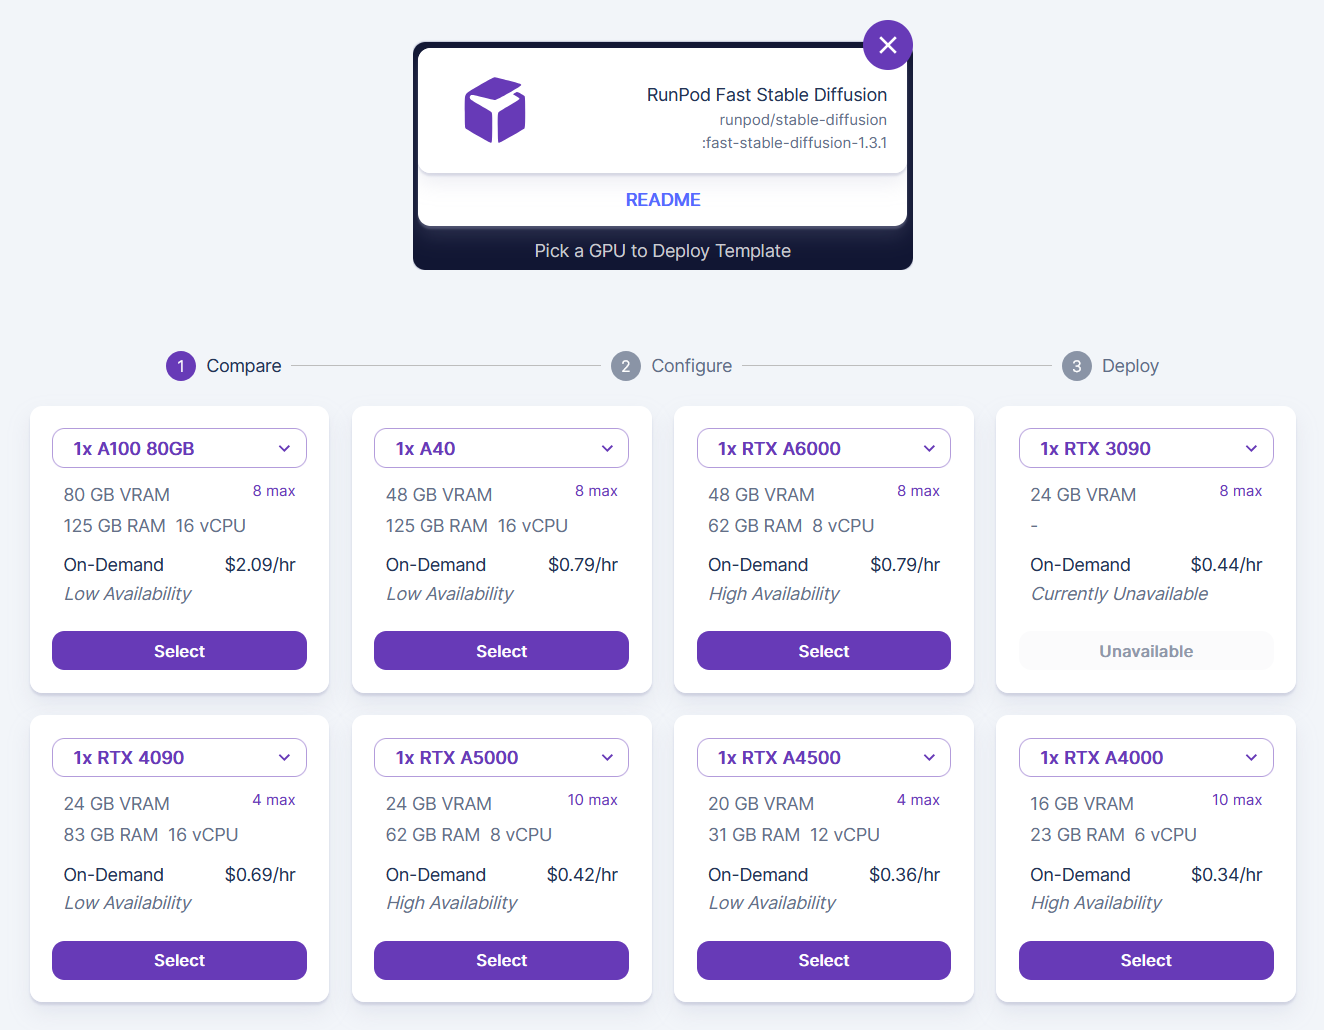
2. Deploy a Stable Diffusion pod
a. You'll see “Runpod Fast Stable Diffusion” is the pre-selected template in the upper right.
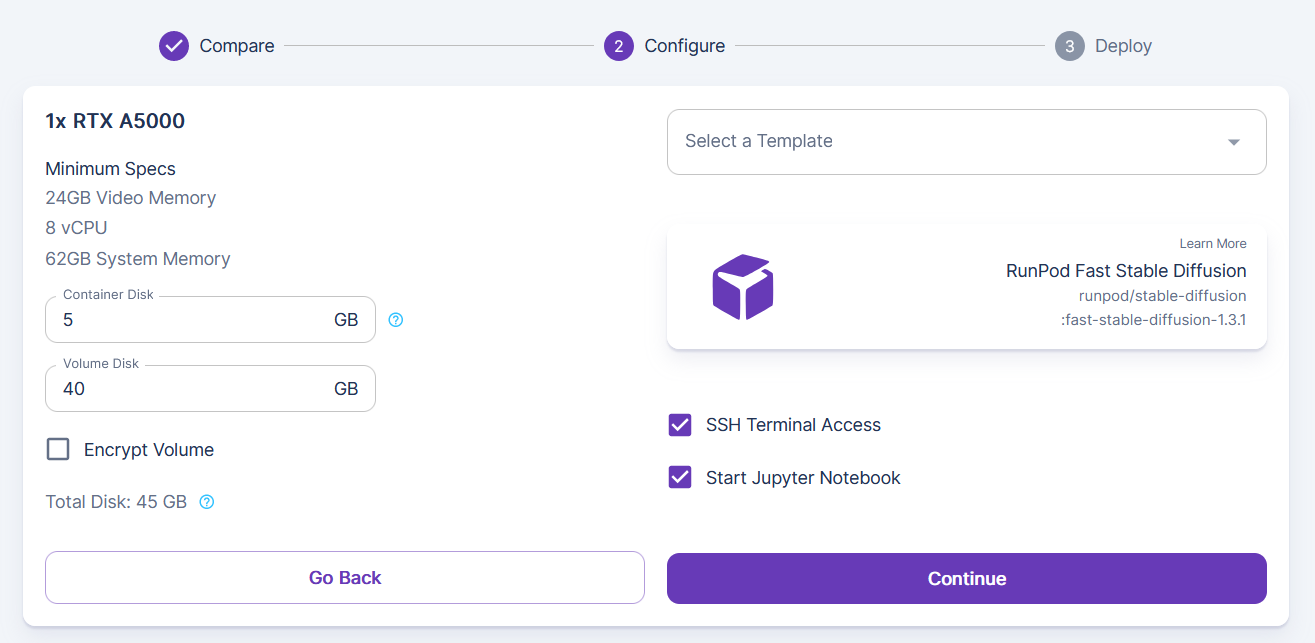
b. If desired, you can change the container and volume disk sizes with the text boxes to the left, but the defaults should be sufficient for most purposes.
c. Make sure to keep “Start Jupyter Notebook” checked.
d. Click “Continue” to deploy.
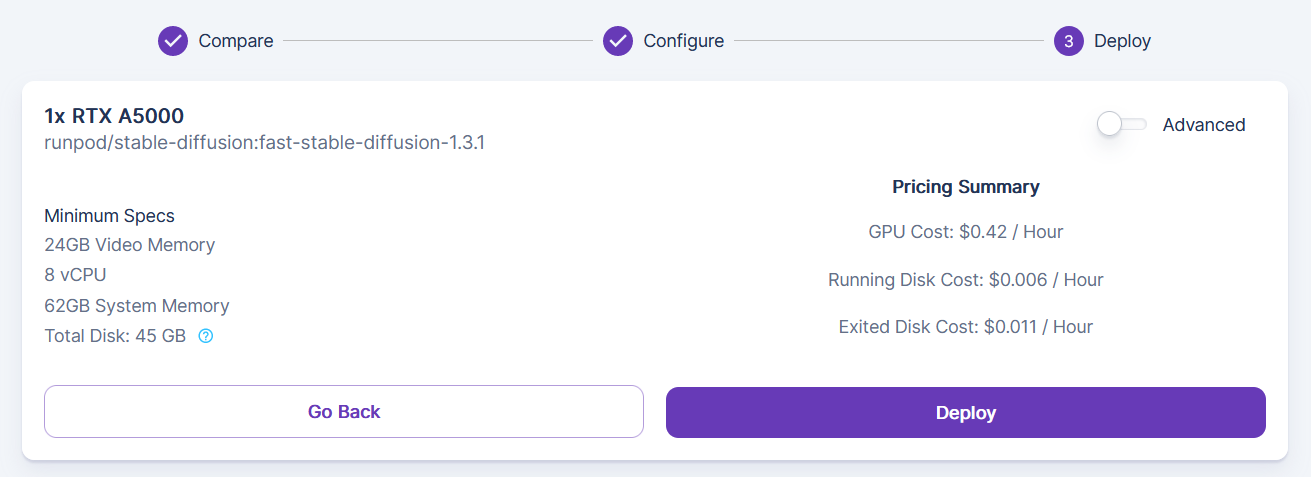
3. You’ll receive a summary of the pod you requested. Review it and click “Deploy” to provision and launch your new pod.
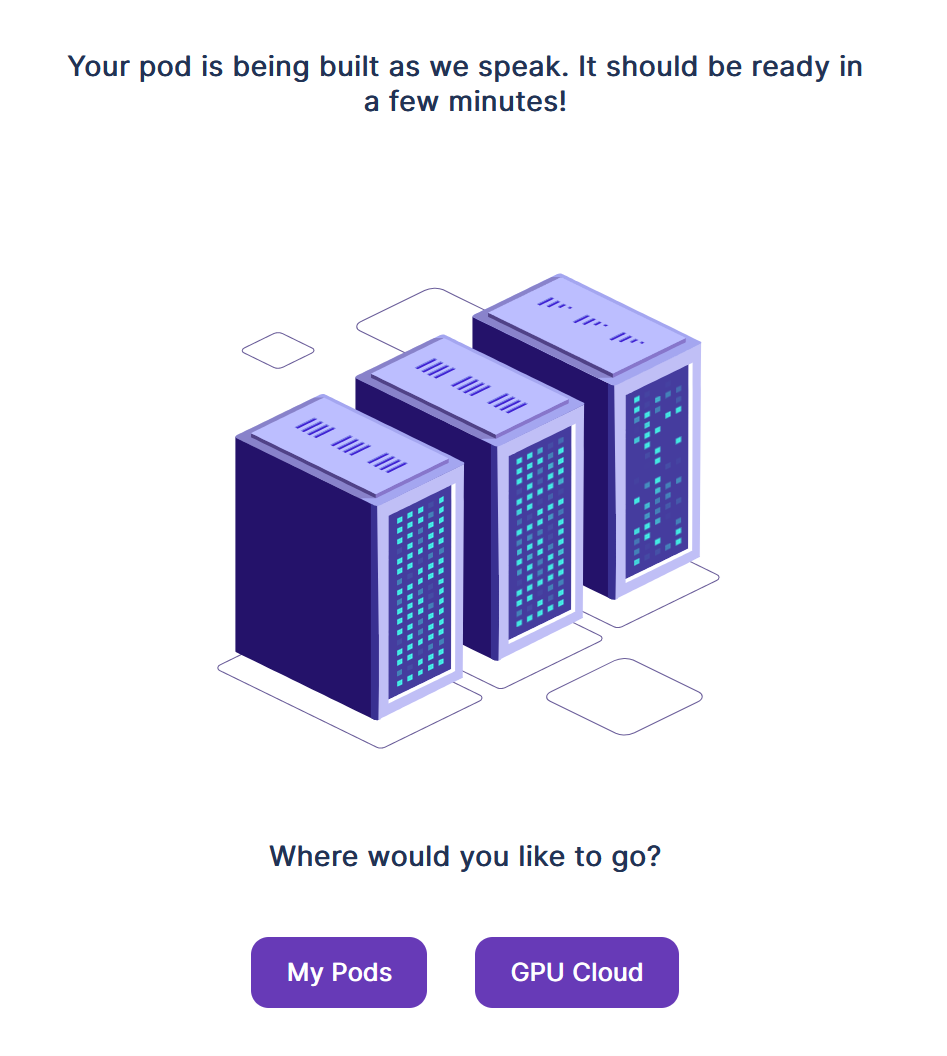
4. Your pod will be set up and available in a few moments. Click “My Pods” to see your pod.
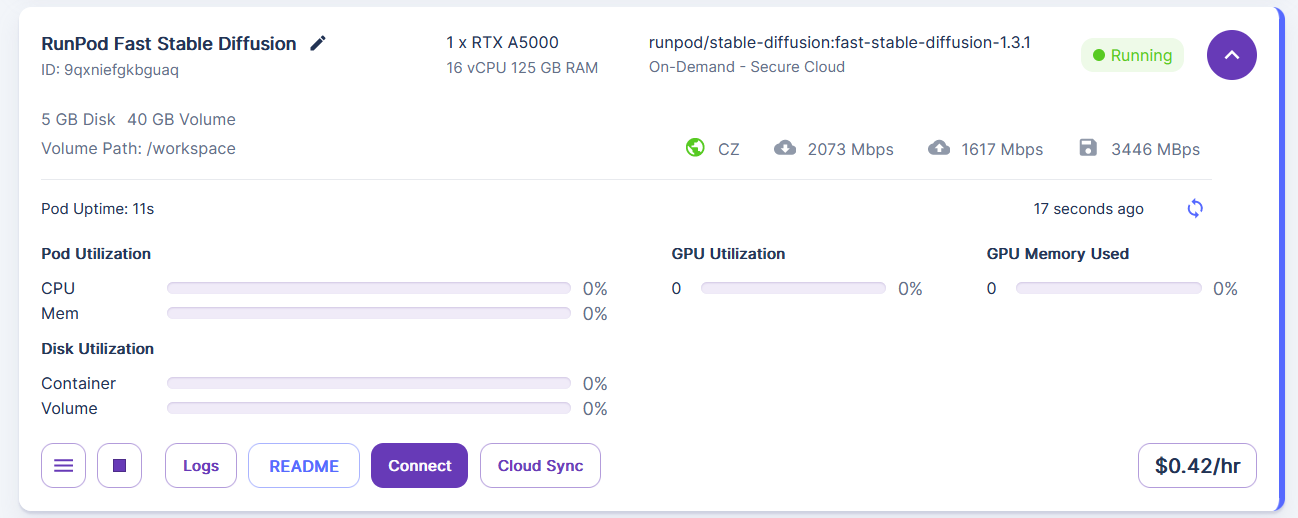
5. Your pod will show up on the “My Pods” page. Click the purple drop-down button in the upper right for additional detail. You can access your pod’s logs from here with “Logs” and then connect to it with the “Connect” button.
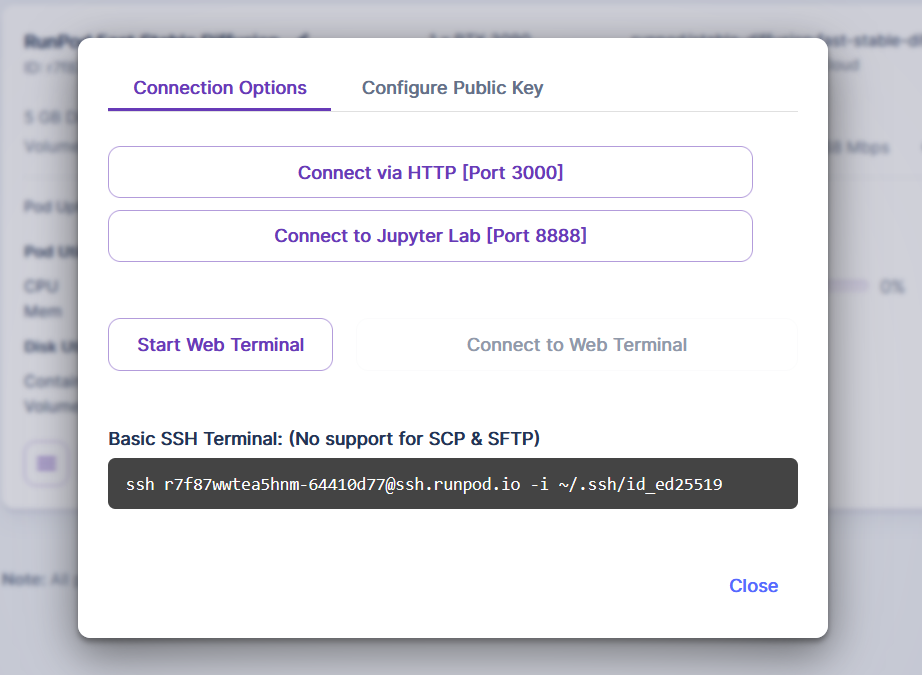
6. Runpod will provide a number of different options for connecting to your pod. Since this pod template provides a Jupyter notebook user interface, and we told it to auto-start, click “Connect to Jupyter Lab [Port 8888]”
1. Training and running the prepackaged Dreambooth workbook is similar to the Automatic1111 workbook in the previous post, but will run without the Automatic1111 web interface initially, as we want to train a model first.
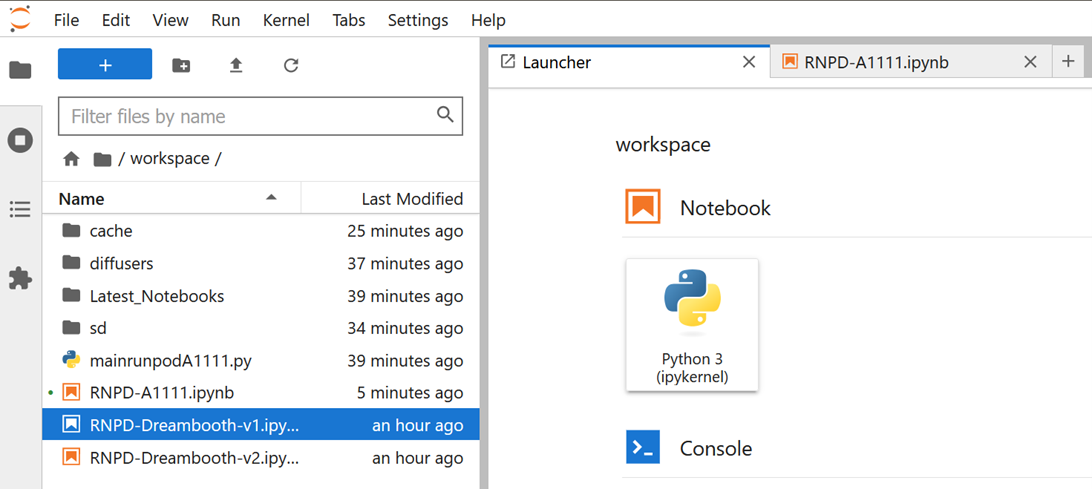
2. To get started with Dreambooth, select the “RNPD-Dreambooth-v1.ipynb” or “RNPD-Dreambooth-v2.ipynb” notebooks in the left-hand pane of Jupyter Notebooks interface depending on the version of Dreambooth you’d like to work with. If you do not see the list of notebooks in this directory, then make sure you created your pod with the Fast Stable Diffusion template rather than one of the other Stable Diffusion template options which do not have the notebooks.
3. Similar to before, run each cell in the workbook sequentially with selecting the cell, and hitting “Ctrl-Enter”. As before, the square brackets to the left of each cell will show an asterisk as the cell runs and will change to a number indicating the order the cells were run in once the cell is completed running. Output providing feedback or allowing for user interface will show up below each cell as it runs.
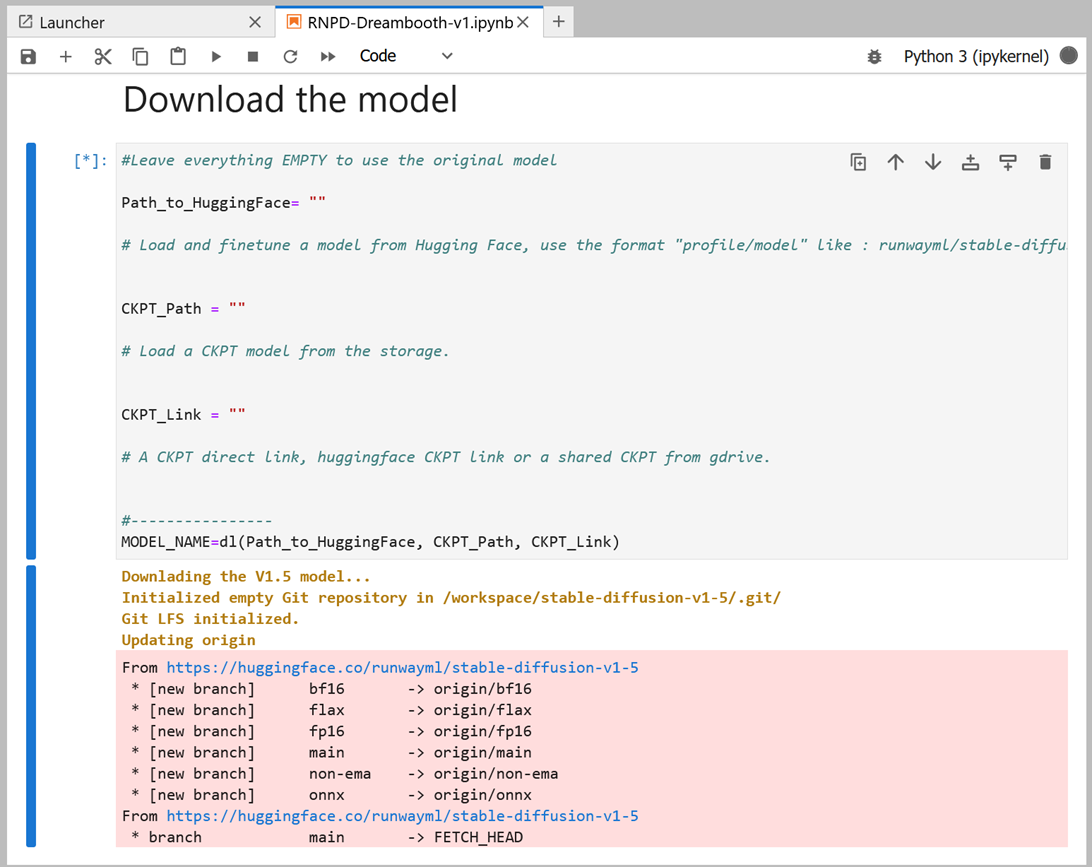
Also as before, these cells can be edited before running them (e.g. to select a model, or download one from Huggingface). The comments indicating what can be changed and where in these cells. For a basic run, the defaults should be sufficient.
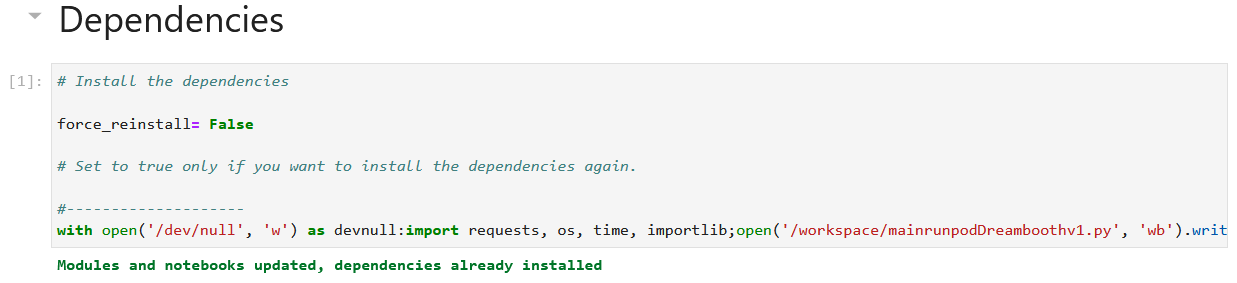
4. Required First, we'll install the dependencies for Stable Diffusion and Dreambooth if needed.
5. Required The model is somewhat large, so the downloading step may take a minute or two to complete. It will sit on the view below as this is done. The output with the pink box below will change to e.g. “Using the original V1.5 model”. If you have access to another model you'd like to use as the base, you can update one of the parameters in this cell to point to a locally uploaded or externally hosted checkpoint file. If you do so, the output will show the load or download process, and in the end say "Done!".
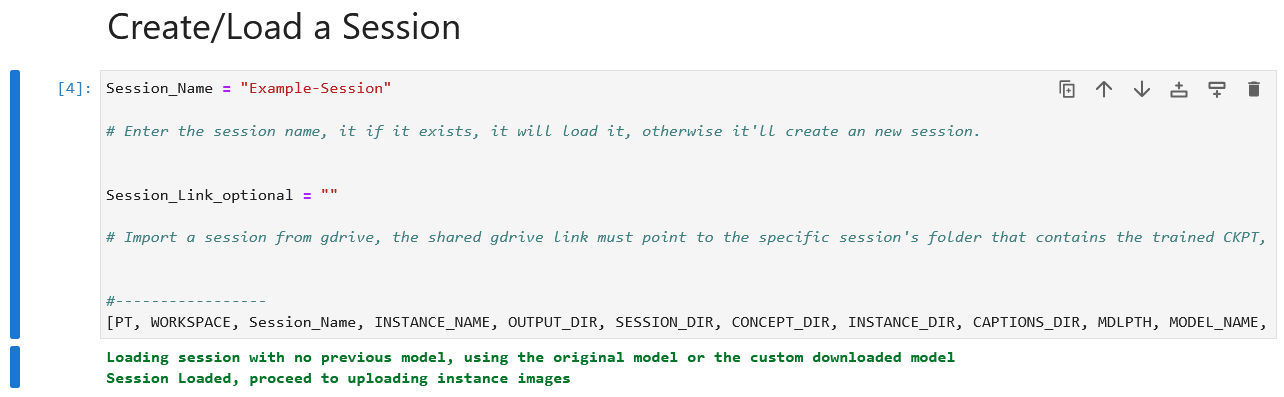
6. Required We'll then create and load a session. You can change the session name if desired, or load one from a external location.
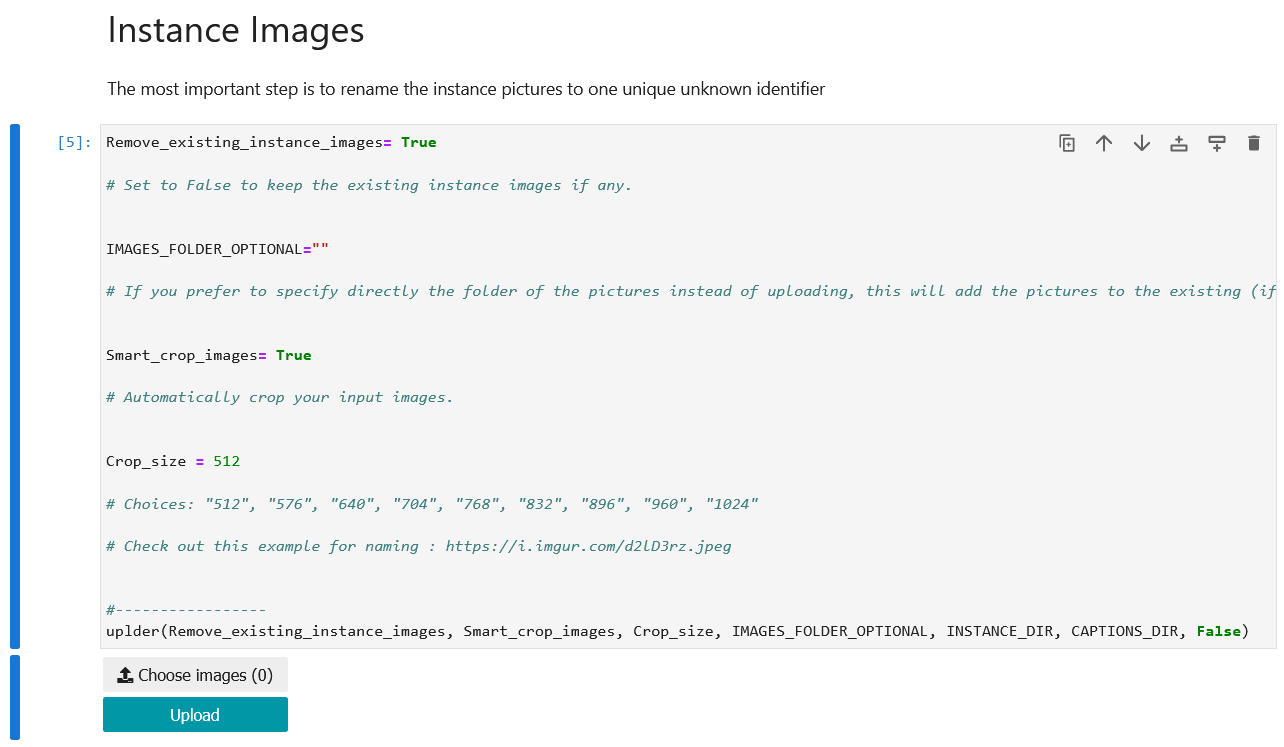
5. Required In the cell labelled “Instance Images”, we will prepare and upload our training instances for the concept we want Dreambooth to encode into the model. In most cases the default parameters will work, but if you need to change something (e.g. the crop size of your input images), you can update things here as described by the comments following each parameter.
Once you run the cell, an interface will come up allowing you to upload your instance images for training. At this stage you will want to prepare your images.
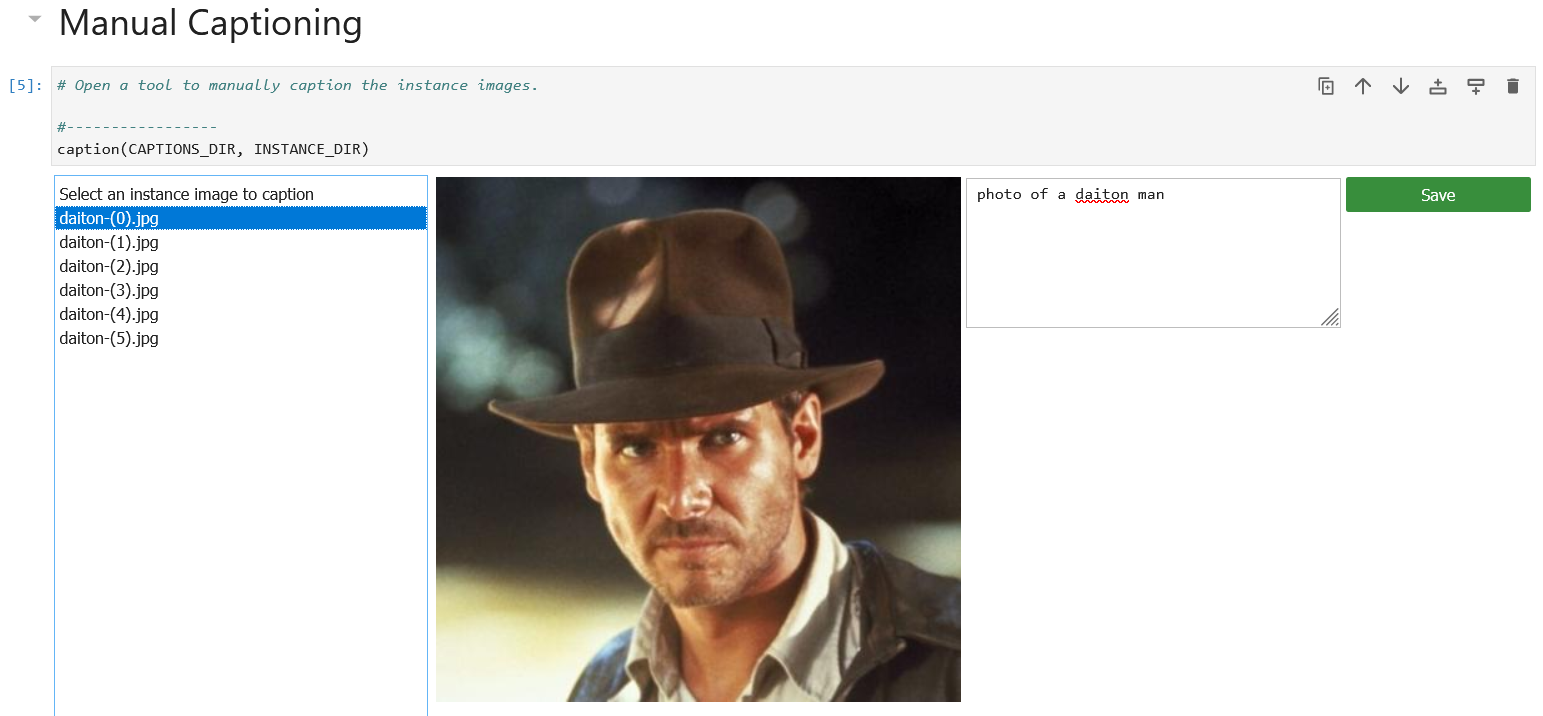
a. Dreambooth works by associating your images with a unique keyword token that isn't strongly associated with any existing concept in the model. For this example, we'll chose "daiton". Choosing a token that is already associated in the model (such as most English words) will result in worse or more inconsistant results.
b. Dreambooth also will expect your input training images to be cropped to be square, and resized to the crop size you select in the Jupyter cell (it’s 512 x 512 pixels by default for Dreambooth v1, and 768 x 768 pixels for Dreambooth v2). Select your training images and crop and resize them accordingly. You will also want to rename your images with the token you selected appended with a number in parenthesis. (e.g. “daiton (0).jpg”, “daiton (1).jpg”, etc.) Here is a tool that is well suited these, and might assist with that, but any image editor should work. Windows’ file explorer will also automatically append these numbers if you select the files together and rename them together. If you want to use these sample images, you can find them in the sample DreamBooth dataset.

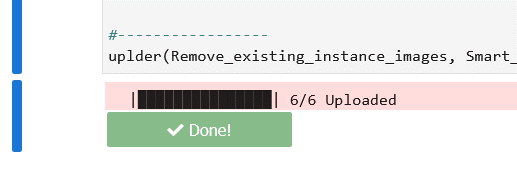
c. In the Jupyter notebook cell labeled “Instance Images” after you run it, you should see a “Choose images” button. Click that and a file interface will come up to allow you to select your instance input images. The button will update with the number of images you selected. You can then click the “Upload” button.
d. Optional You will then in the next cell (“Manual Captioning”) be able to provide a caption prompt for each of your images. The captions you add can be simple, but should include your selected keyword and similar to a short prompt (e.g. “photo of daiton”). In many cases the same caption might work for all your input images. This step is optional, but might result in better results.
e. Optional You can then optionally add “Concept Images” in a similar manner to provide contrasting examples of your target category. This step is optional, and can be skipped.
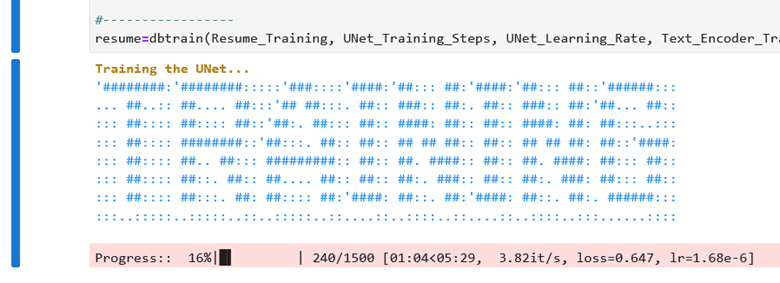
7. Required In the cell labeled “Dreambooth”, you can tweak the training parameters if desired, but it should be fine in most cases to leave these as is. Run the cell to set the parameters and begin training. You can watch the process in the pink box in the output panel. The progress bar will complete twice and take a several minutes to complete training with the time taken depending on the size of your input dataset and the parameters you chose.
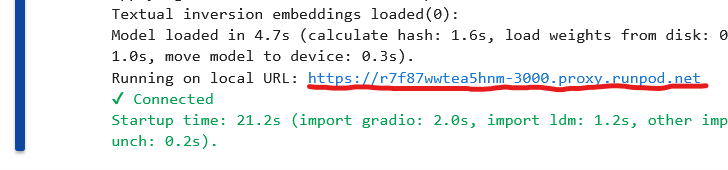
8. Optional In the next cell “Test the Trained Model” you can use your newly trained Dreambooth model to generate output images. Running this cell will provide a blue link ending in “.proxy.runpod.net” (highlighted below) to an instance of Automatic1111 you can use to work with your model in a new tab.
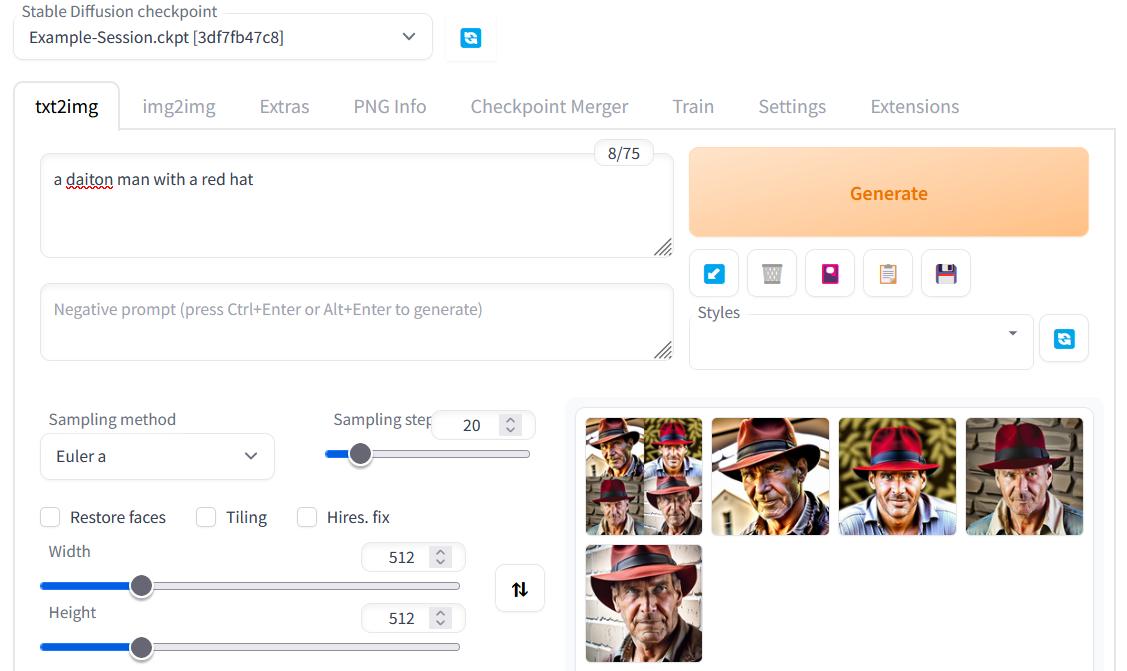
9. Generate prompts using the unique token you selected to generate images with the concept from your input images.
10. In the second to last cell “Upload the Trained Model to Hugging Face”, you can optionally save your model to HuggingFace if you have an account there.
Author profile: Pardeep Singh
Blog Posts
Queue for any GPU spec, even one that's fully rented out, and we'll deploy it the moment capacity opens up. No more refreshing the console or running a sniping tool.
Explore why faster chips have shifted the bottleneck to AI infrastructure, and what that means for teams running production workloads.
.jpeg)
With MIG, we can partition RTX 6000 Pro cards into isolated 24 GB instances. Here's when it makes sense for your workloads.
